
St. Patrick’s day is coming! There are a lot of different reasons to be excited about St. Patrick’s Day. Some may get excited to celebrate the patron saint of Ireland. Others may enjoy celebrating their Irish heritage. Even if you’re not religious or Irish, it’s still just plain fun to see so many people wear green (my favorite color), eat and drink green everything, and get so stinkin’ excited about this one day of the year.
I’m Irish (though I’ve been wanting to take one of those DNA tests to see exactly what percent), and I grew up Catholic in the Chicago suburbs where they dye the Chicago River green and serve green beer every year in celebration of St. Patrick’s Day. It’s serious business up there. ;P
On top of all of this, my husband and I got engaged on St. Patrick’s Day and I’m a total sucker for just about any holiday because it gives you an easy go-to theme for recipe planning. Not to belittle the true meaning of any holiday, but if it means I get to bake extra treats, I’m in. 😛
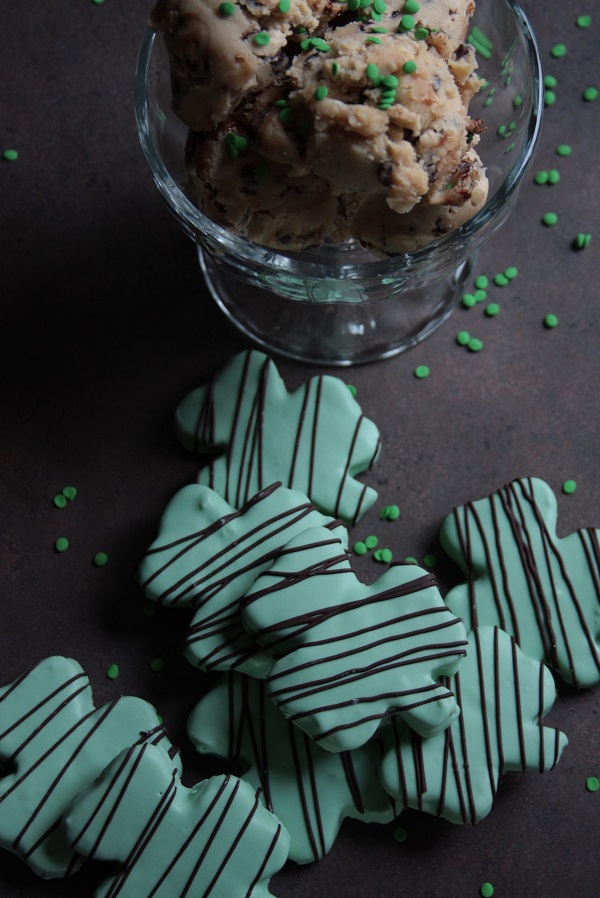
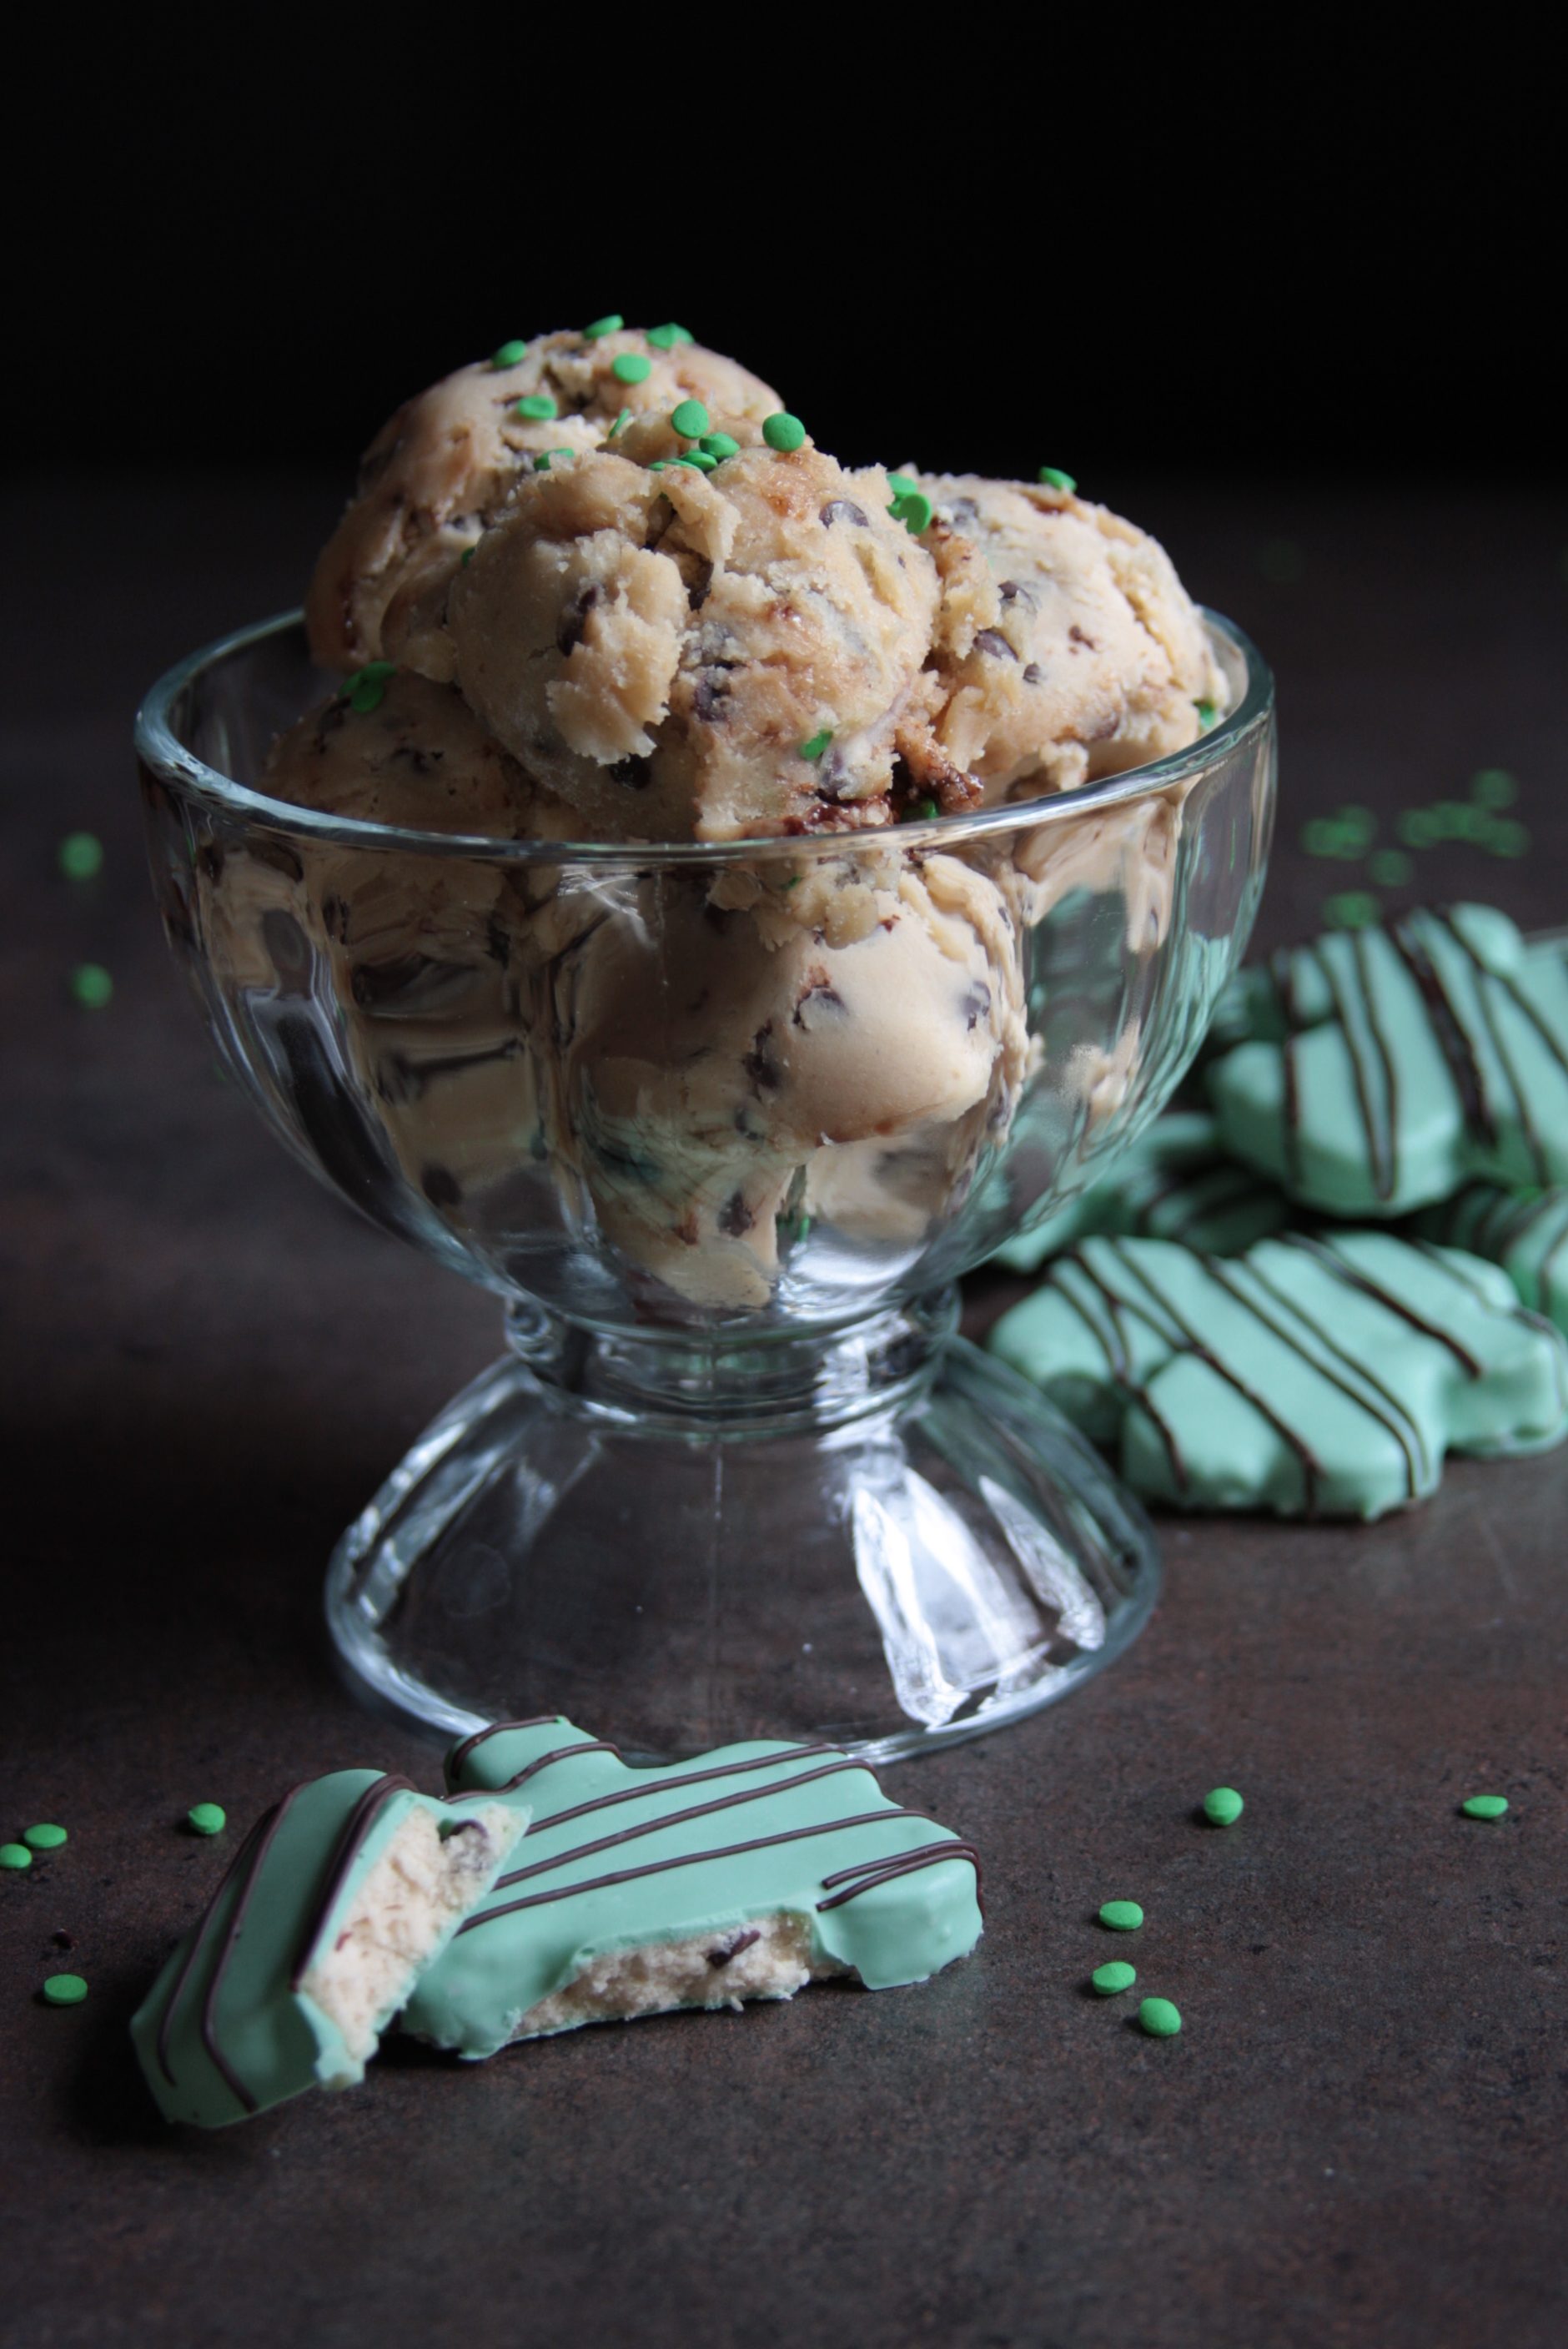
I just finished a recipe for completely safe to eat cookie dough and wanted to show another way to use it. I mean, let’s be serious. You don’t need another way to use it. It’s perfection straight out of the bowl with spoon stuck in it. I guess you could say these instructions give you another excuse to make edible cookie dough. 😉 Plus, it dresses the cookie dough up and can really be altered for ANY holiday or special event. If they make a cookie cutter for it, you can make candy coated cookie dough treat for it.
Figuring out the best method to cleanly cut out and evenly coat the cookie dough was not easy. I’m talking 4-wasted-batches-of-cookie-dough not easy. Cold cookie dough is really hard to roll out. Too warm though, and it is too sticky to work with. Then again if it’s too cold, the candy coating hardens instantly before it smooths out. Too warm and it turns into a pile of mush under the heated candy coating before you can even set it down. Like I said, NOT EASY.
But never fear! I figured it out! Ultimately, I realized it was going to have to be coated before being set down onto wax paper because then you just get this pool of melted candy around it that is nearly impossible to clean up and it looks awful. Then I found this video and my hunch was confirmed. She actually explains so many of the things I had questions about. She’s making truffles and using tempered chocolate, but all of the principles she talks about still apply.
She talks about how the filling for the truffles needs to be room temperature, otherwise the chocolate is shocked when it touches the cold filling and will harden instantly and be more prone to cracking later. That’s the exact problem I had! Cookie dough is a lot stickier to work with at room temperature than the ganache filling she’s working with though. Plus I needed to be able to use a cookie cutter on it, not roll it into a ball or cut it into cubes.
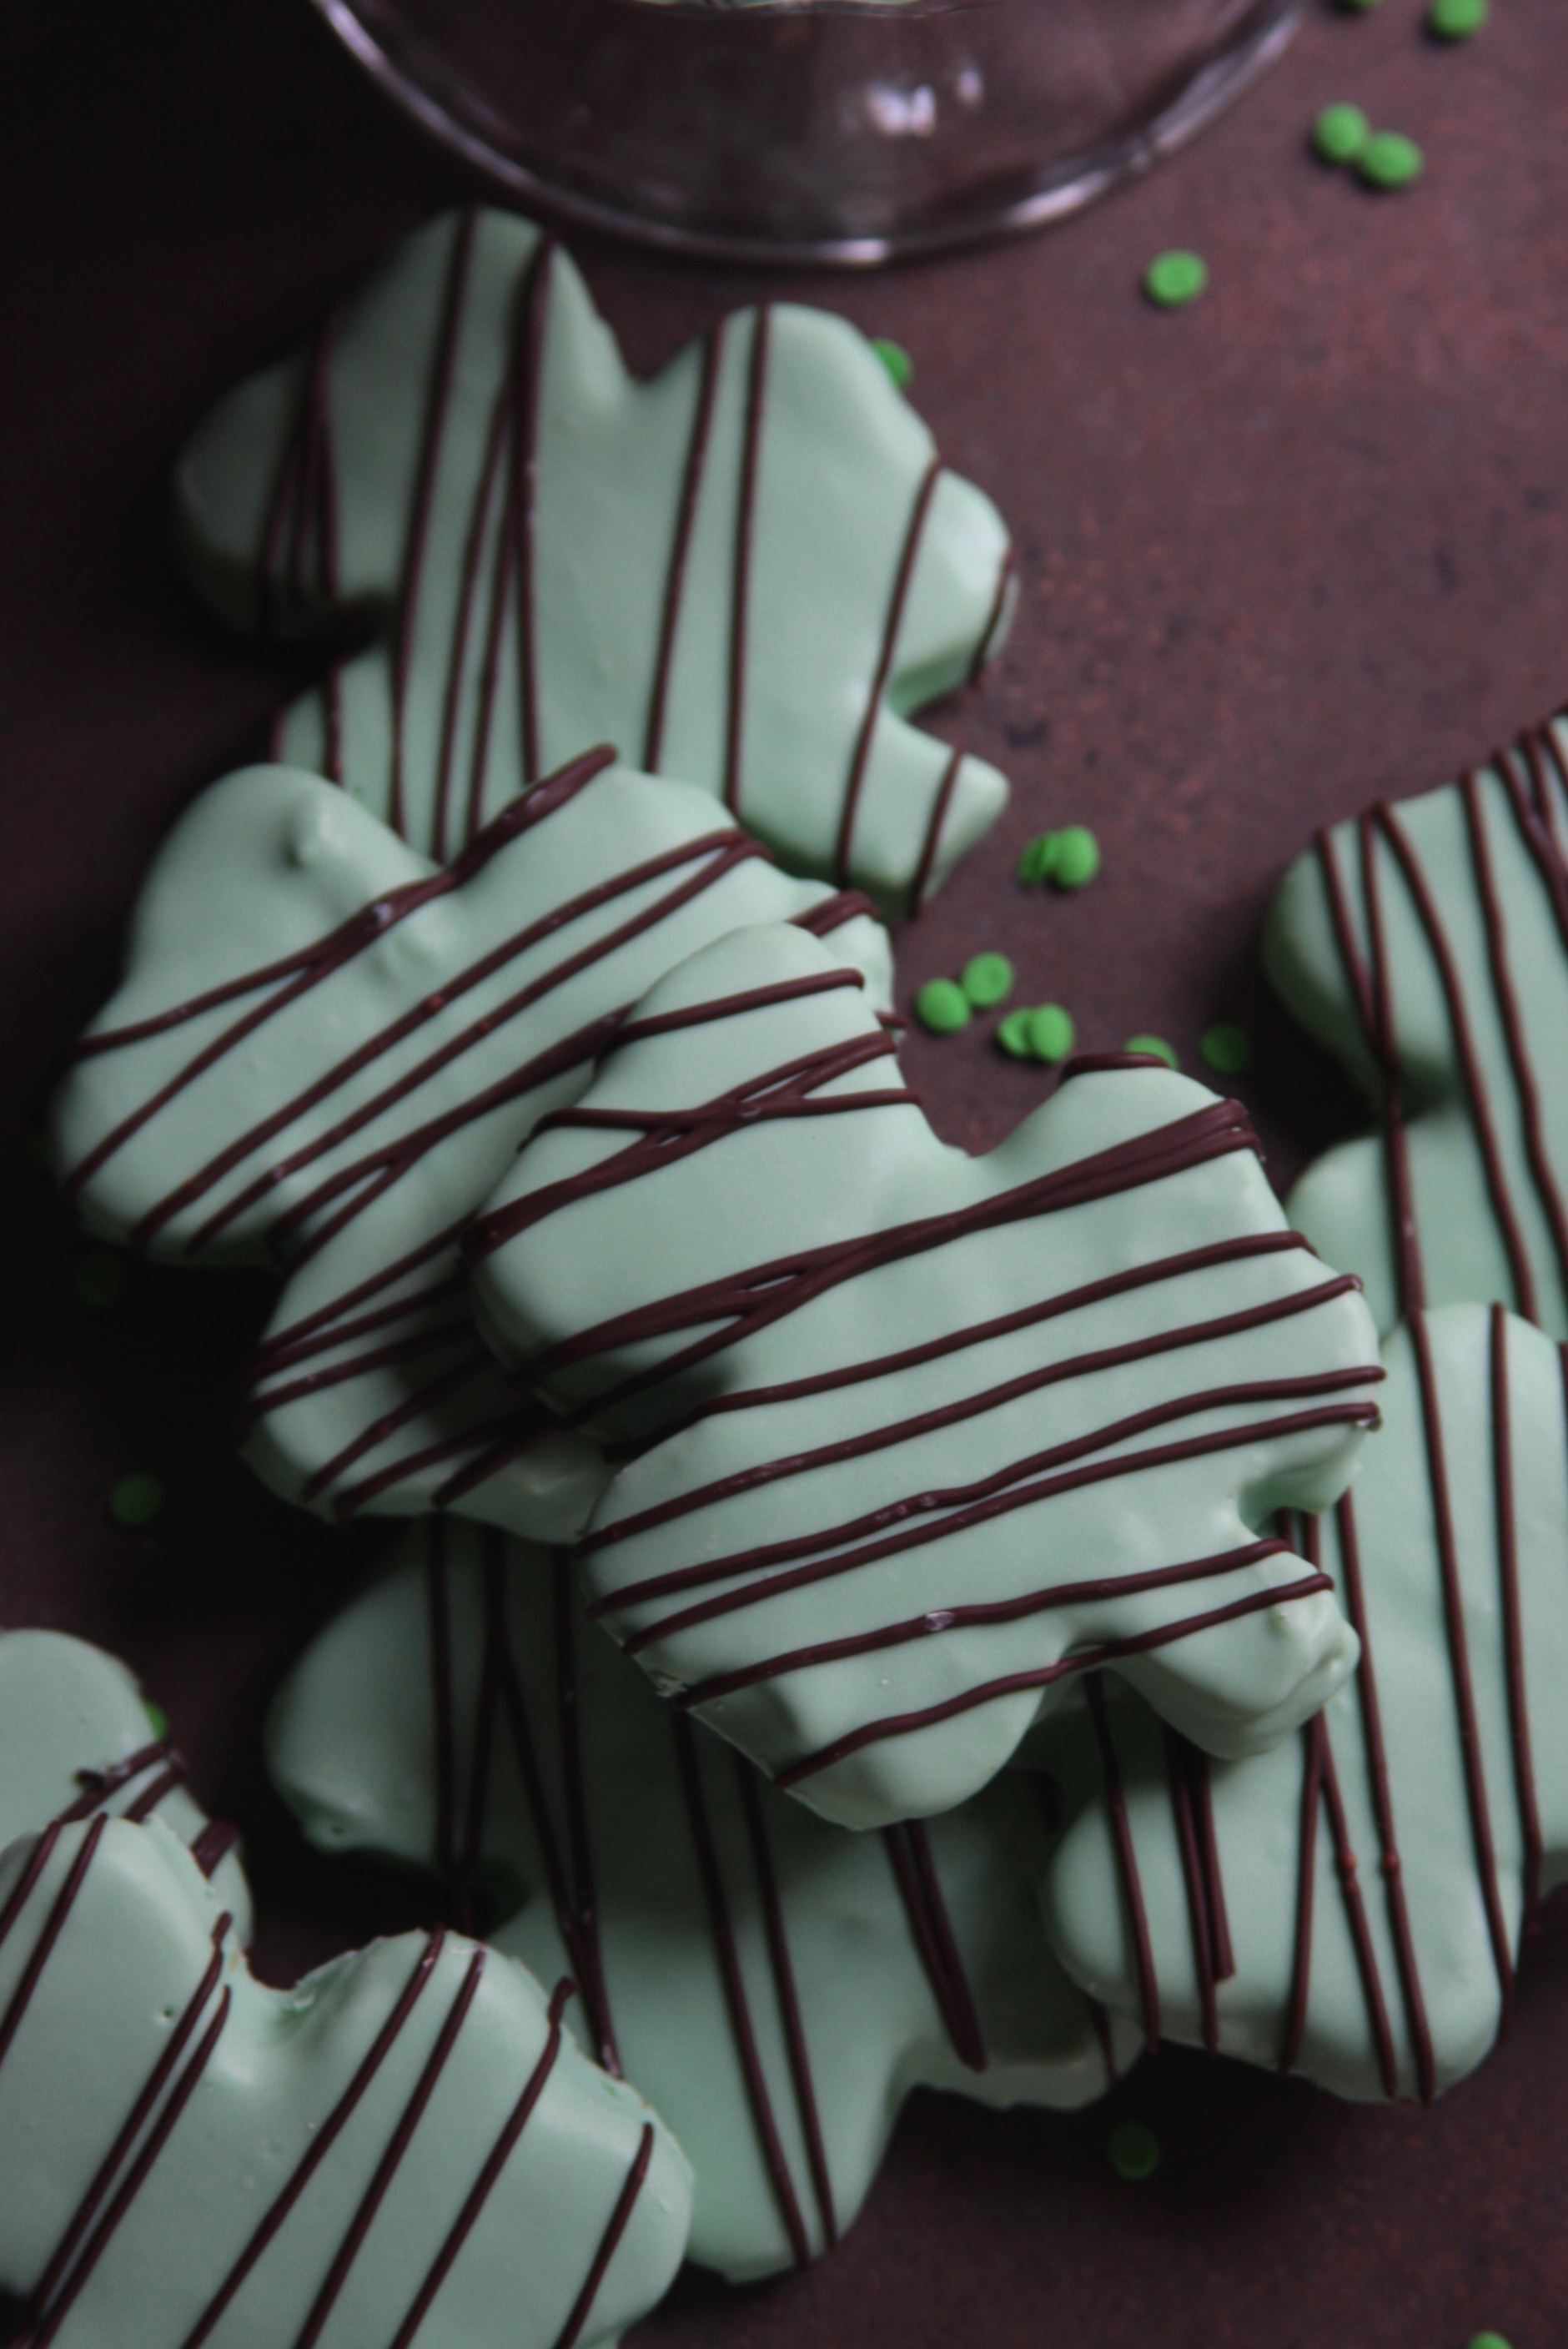
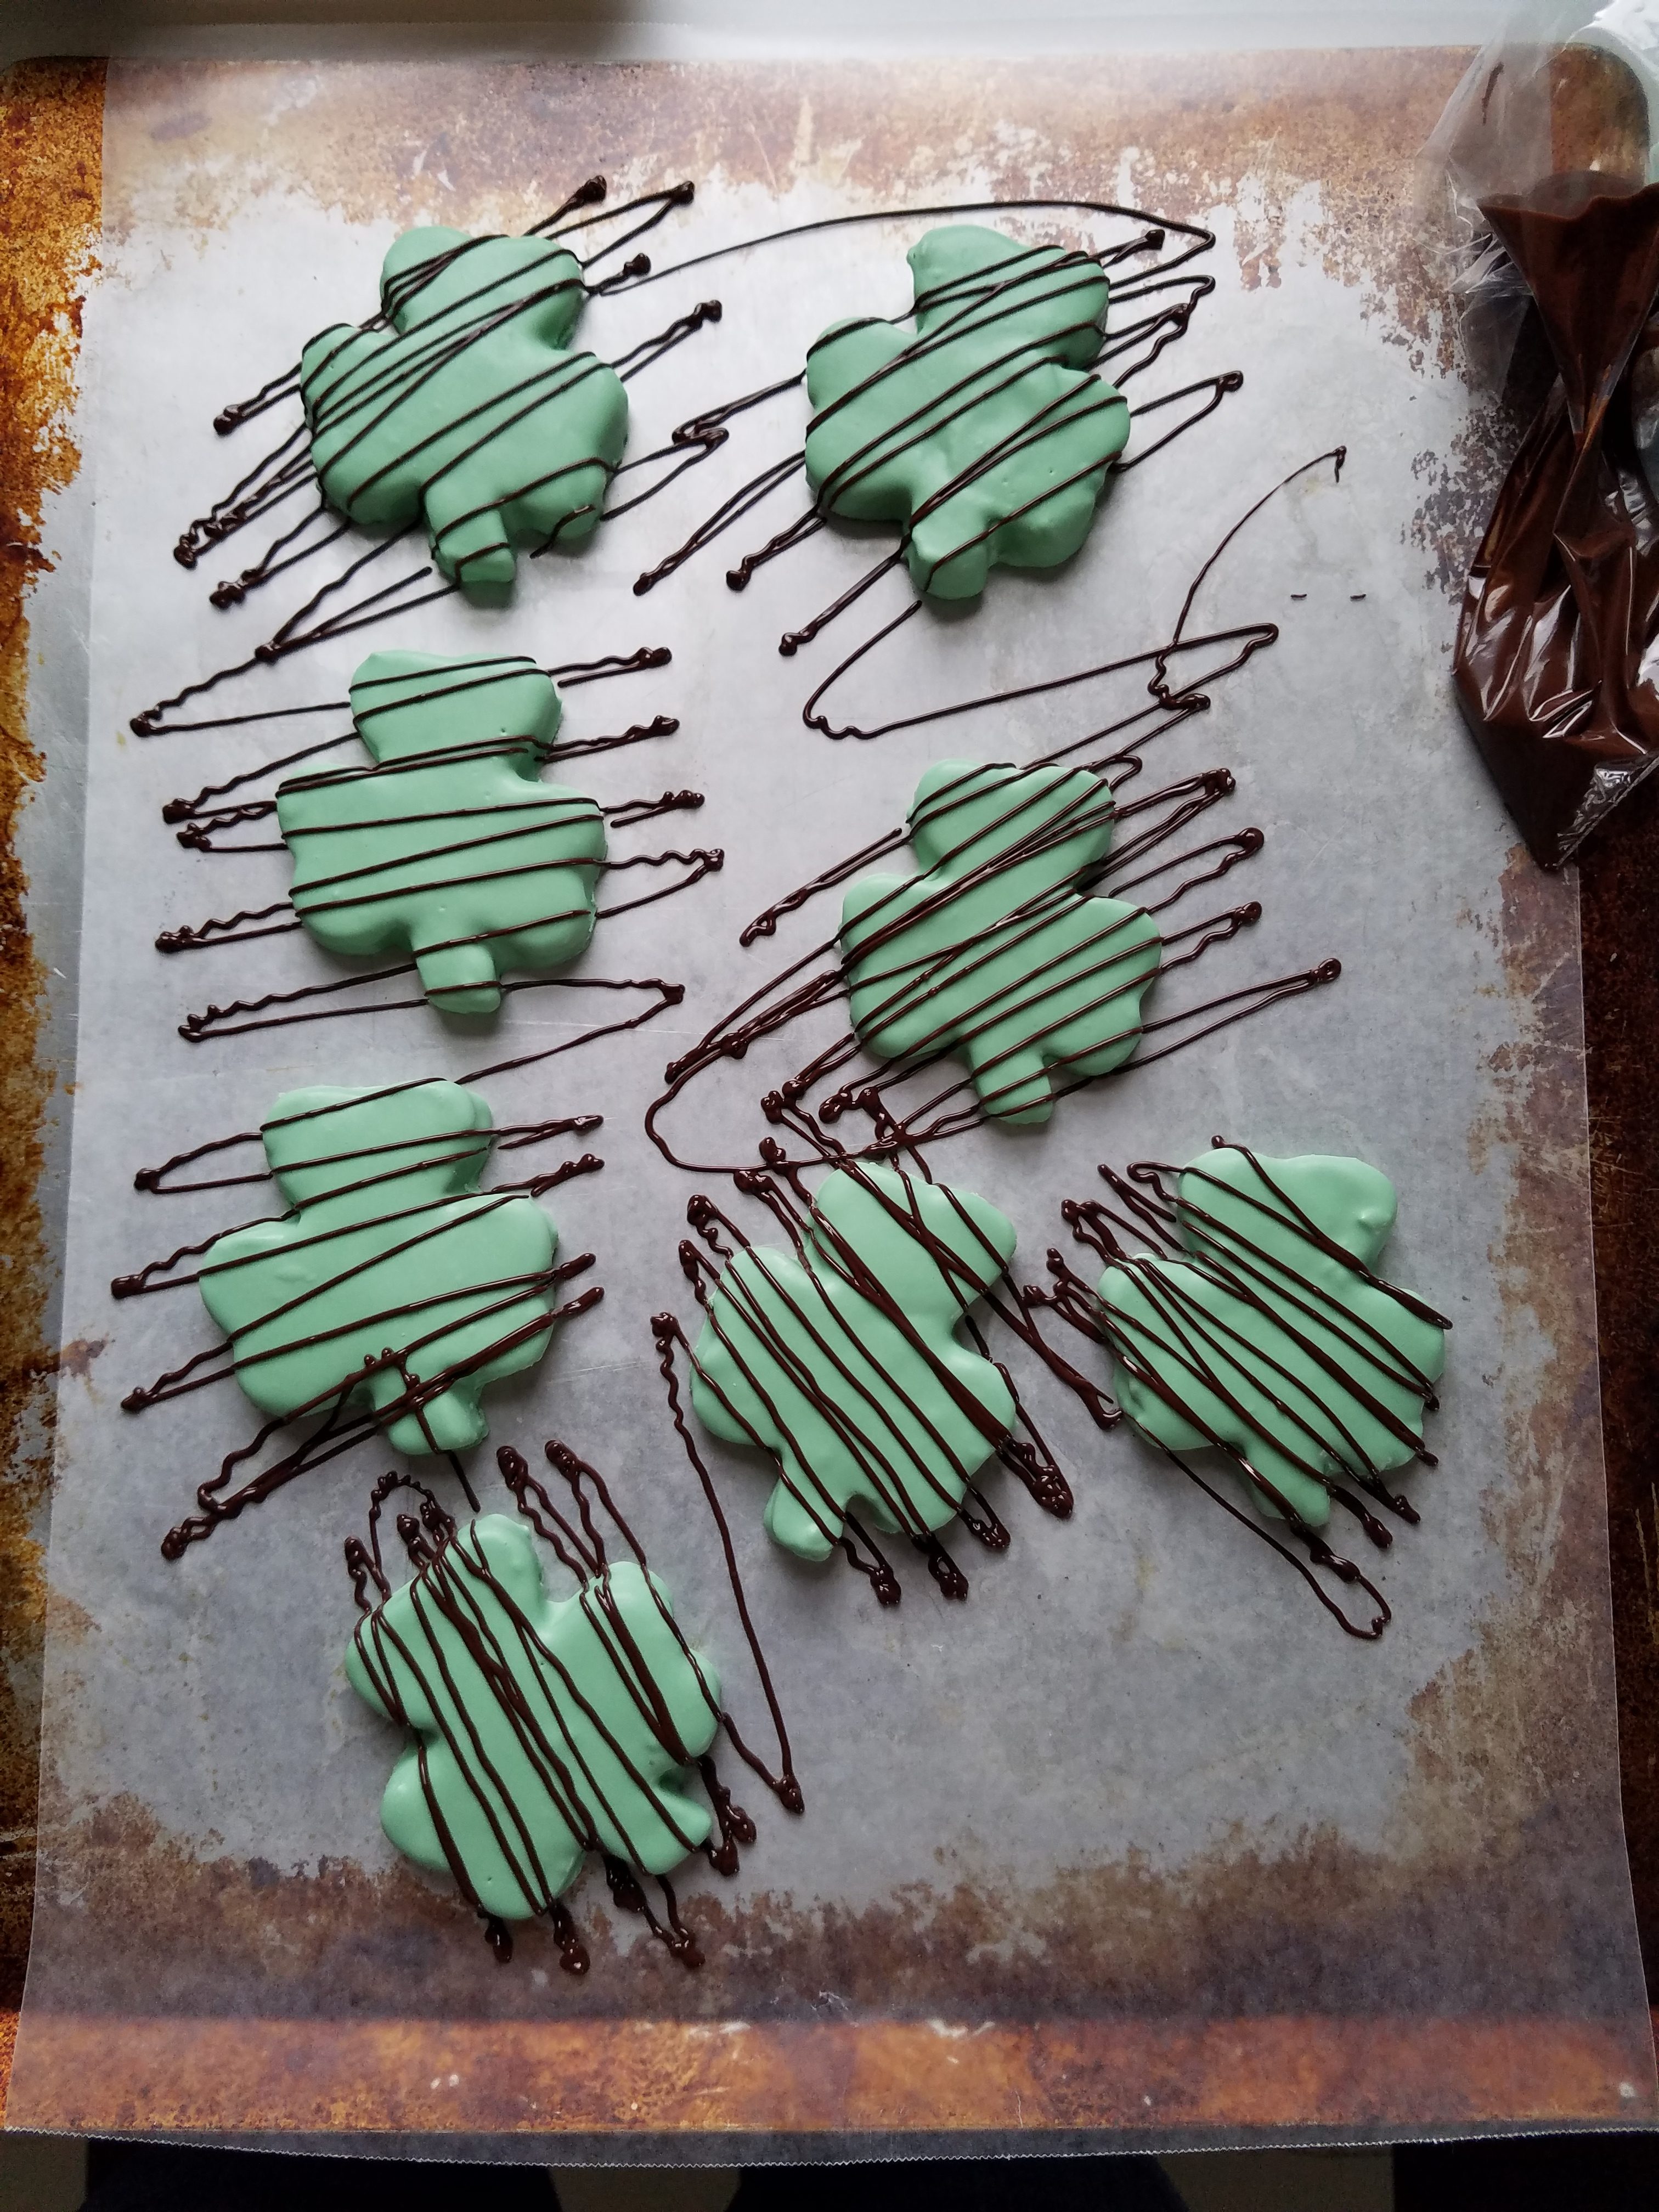
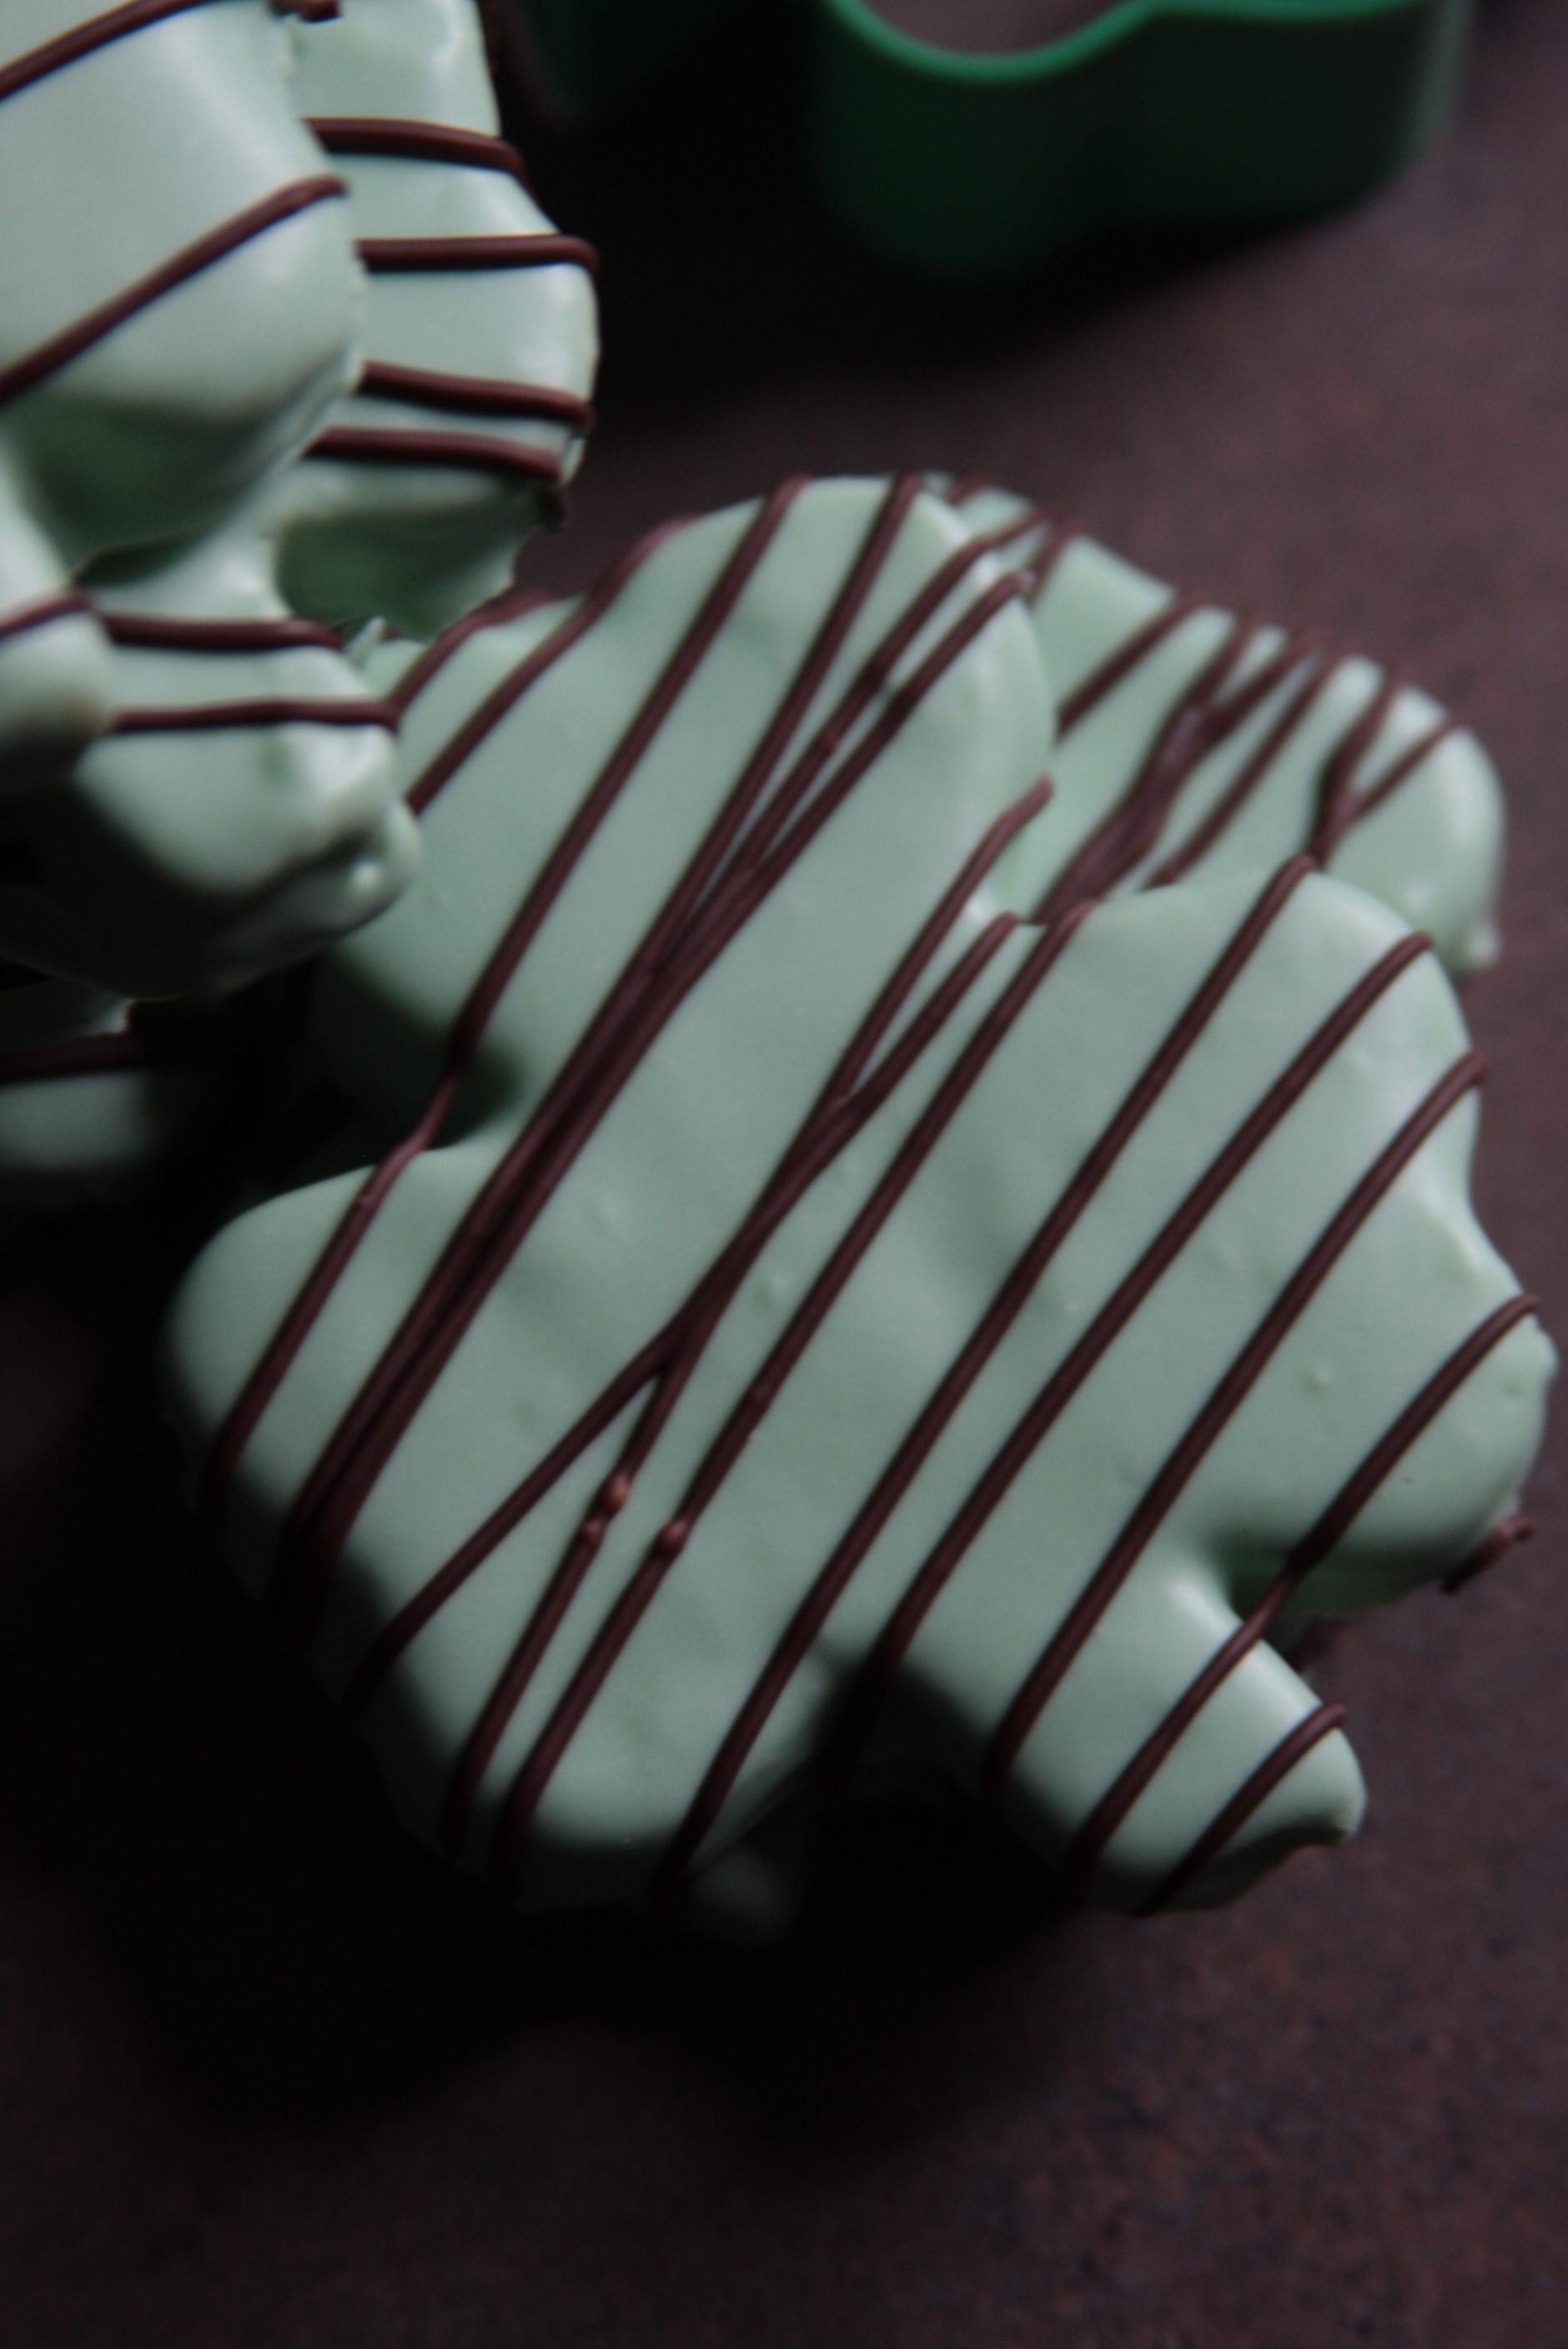
Taking all of her notes into consideration, I was able to come up with a method for coating the cookie dough that actually works. It does take a bit of practice. Even my final shamrocks were not perfect but if you had only seen the first three attempts, you’d understand just how miraculous these look in comparison. 😉 I have so much more respect for chocolatiers now. I already knew working with chocolate was difficult. Tempering chocolate is no joke and that’s one of the reasons I used candy coating for these and just a drizzle of chocolate instead of the other way around. This project has taken my respect for them to a whole new level though. Very impressive.
| Prep Time | 1 hour |
| Cook Time | 30 minutes |
| Passive Time | 2 hours |
| Servings |
|
- 12 ounces Wilton Candy Melts I used 6oz bright white and 6 oz green to get this shade of green.
- 4 tablespoons solid shortening
- 4 ounces dark chocolate or your favorite kind of chocolate. You could also use chocolate flavored candy melts if you don't want to mess with tempering real chocolate.
- 1 batch Easy Edible Cookie Dough Recipe linked in "Recipe Notes" section below.
- flour for dipping the cookie cutter in
Ingredients
|
|
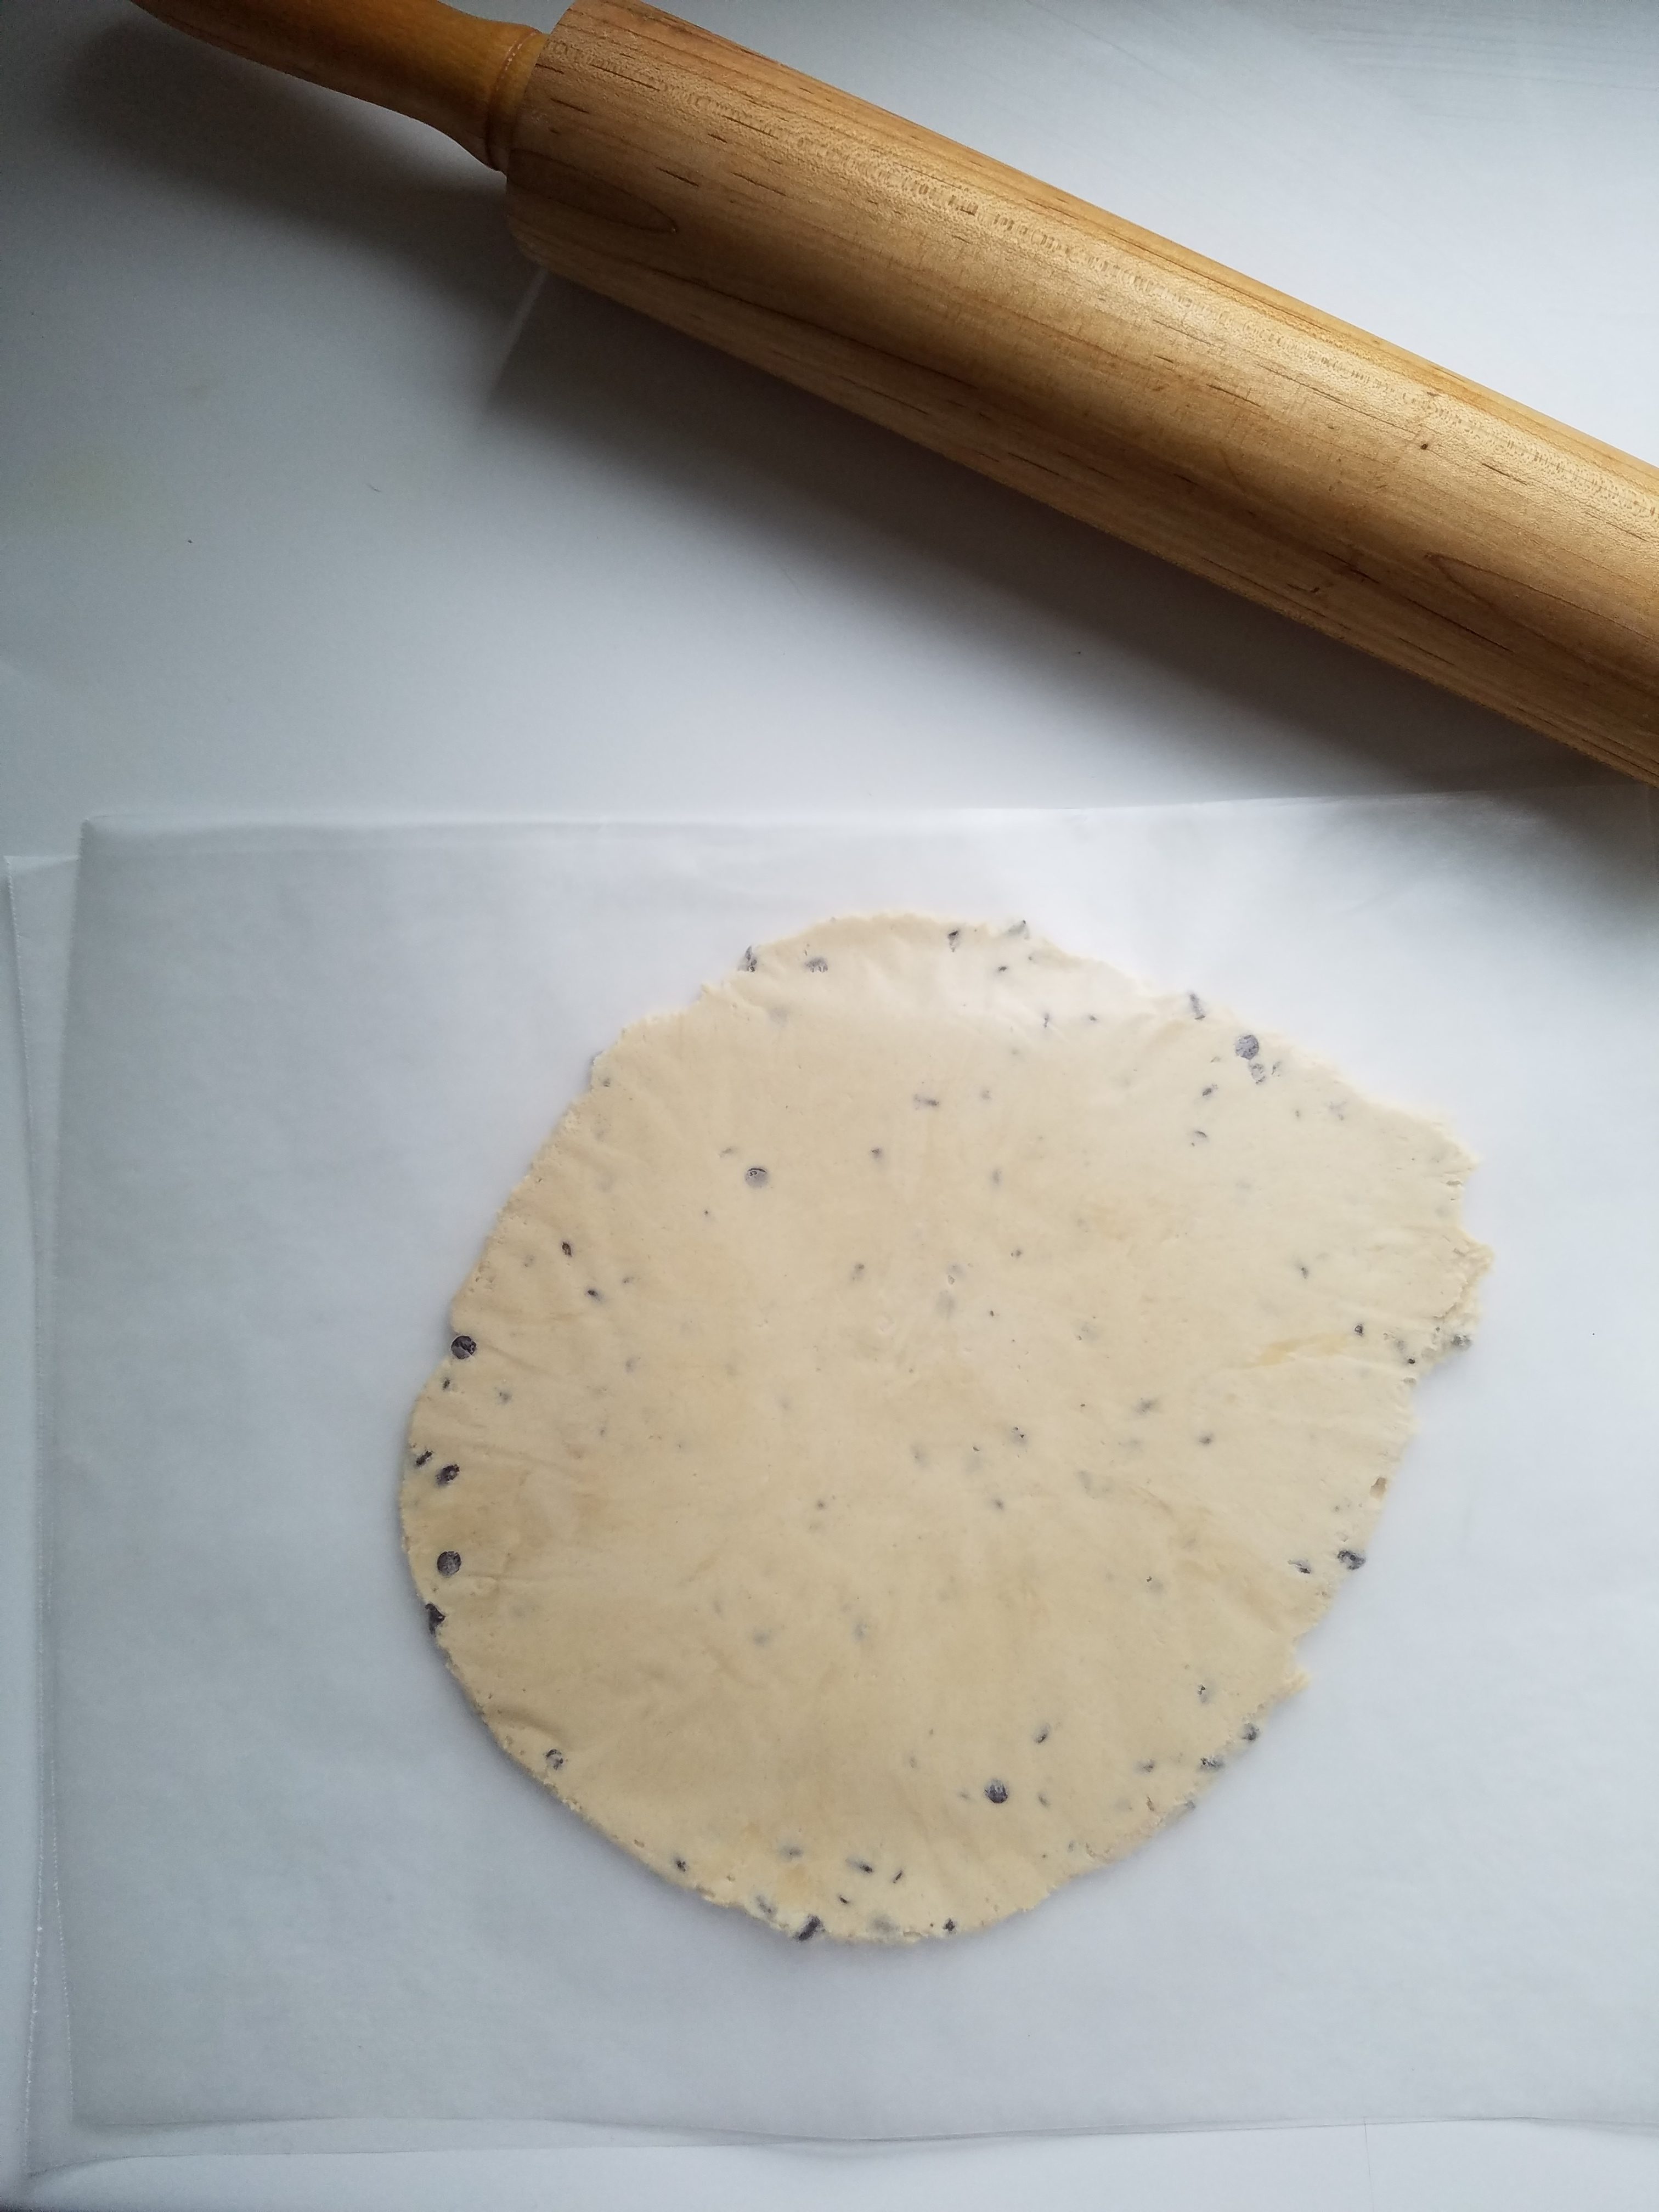
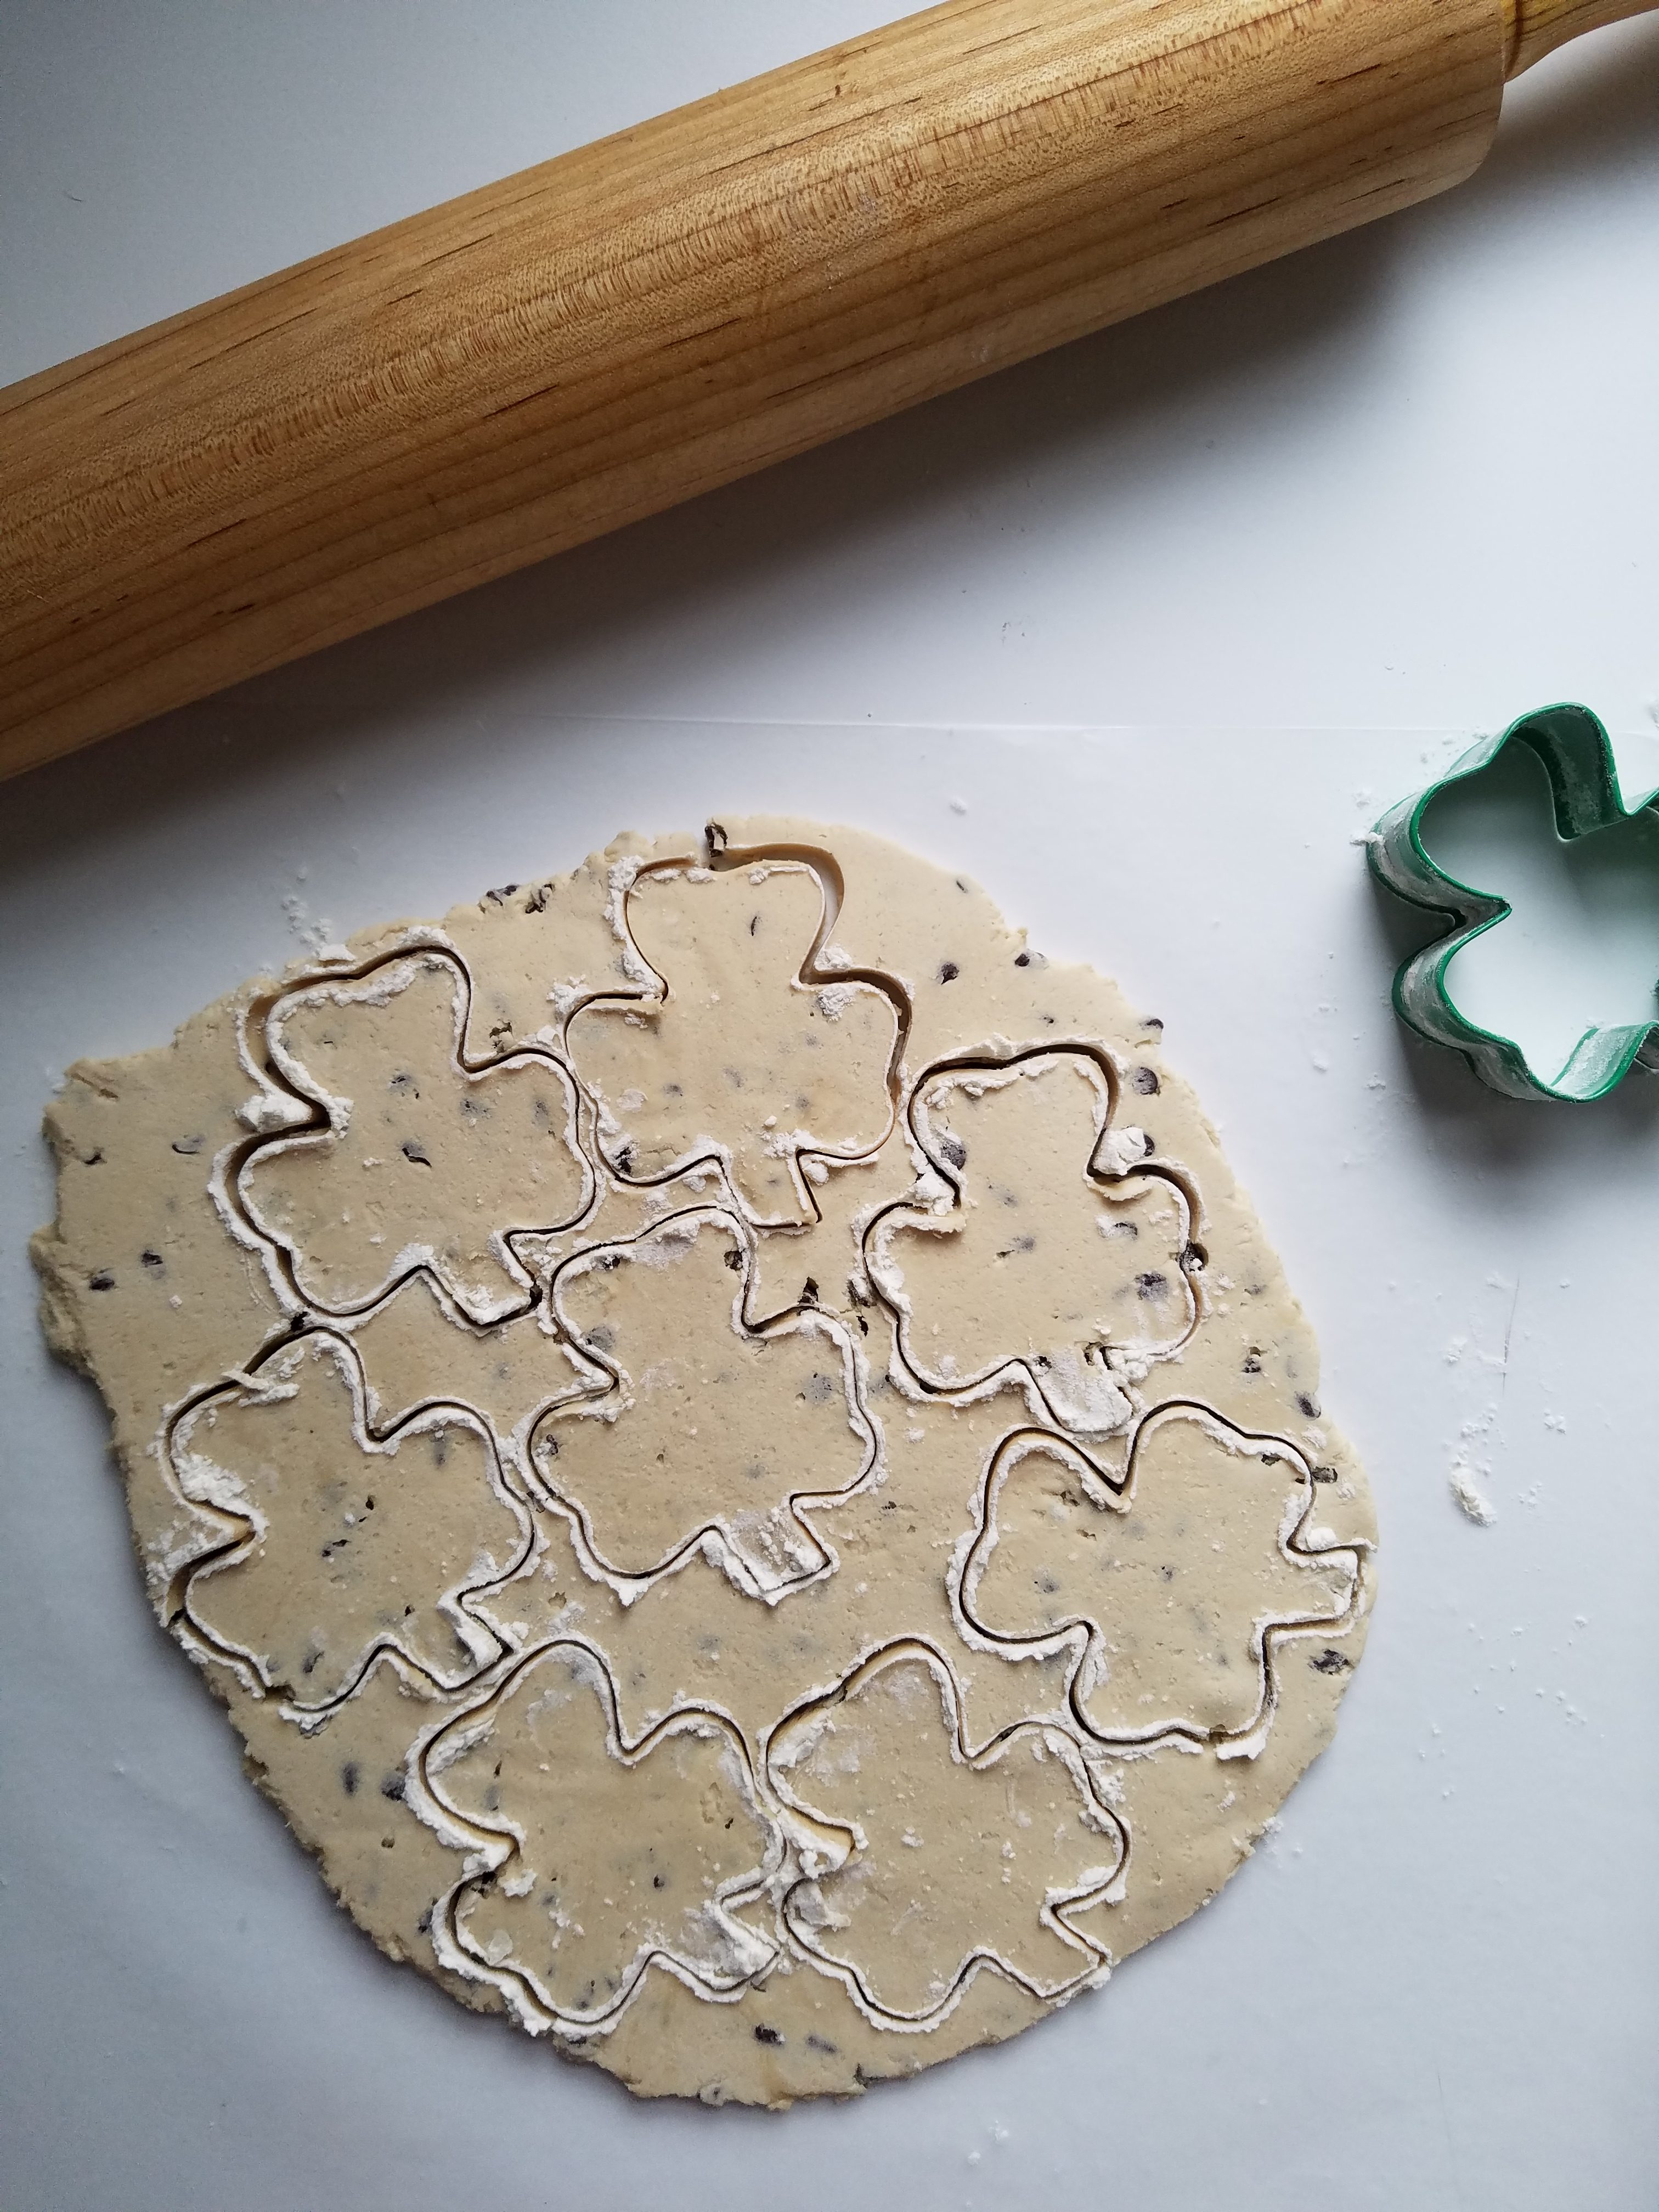
- Make the cookie dough and before you refrigerate it, press it between two pieces of wax paper and roll it to your desired thickness. Leave it between the wax paper and put it in the fridge for at least 15-20 minutes to firm up a bit.
- Select a cookie cutter in whatever shape you like. The smaller and simpler, the better. The 2 inch shamrock shape I used is probably about as large as you want to go. Cookie dough is very soft when at room temperature and at 2 inches wide, I had to work VERY quickly to get each one done before it turned to mush. If I had a cookie cutter half this size, I definitely would have used it and made them slightly thicker.
- After your dough is chilled, take it out of the fridge, lay it on the counter and peel off the top layer of wax paper. Then replace that layer, flip the dough over, and remove the new top layer of wax paper. The sheet of wax paper that is on the bottom when you roll out the dough is much harder to get off than the top layer. If you leave the bottom layer as the bottom, then try to cut out shapes, when you go to peel them off the paper, it's a mess. Releasing the top layer of paper then flipping it so what was your top layer is now your bottom makes it easy to pop your shapes off of the paper when you're done cutting them out.
- Even though you've refrigerated the dough, it will still be a bit sticky. You have to dip your cookie cutter in flour every single time before cutting out a shape. Dip the cutter in flour, press it into the dough, then carefully remove it. You will probably have to press the dough down through the cutter in any tight areas. I had to do this with all 3 leaves and the stem to ensure they stayed attached as I lifted the cutter.
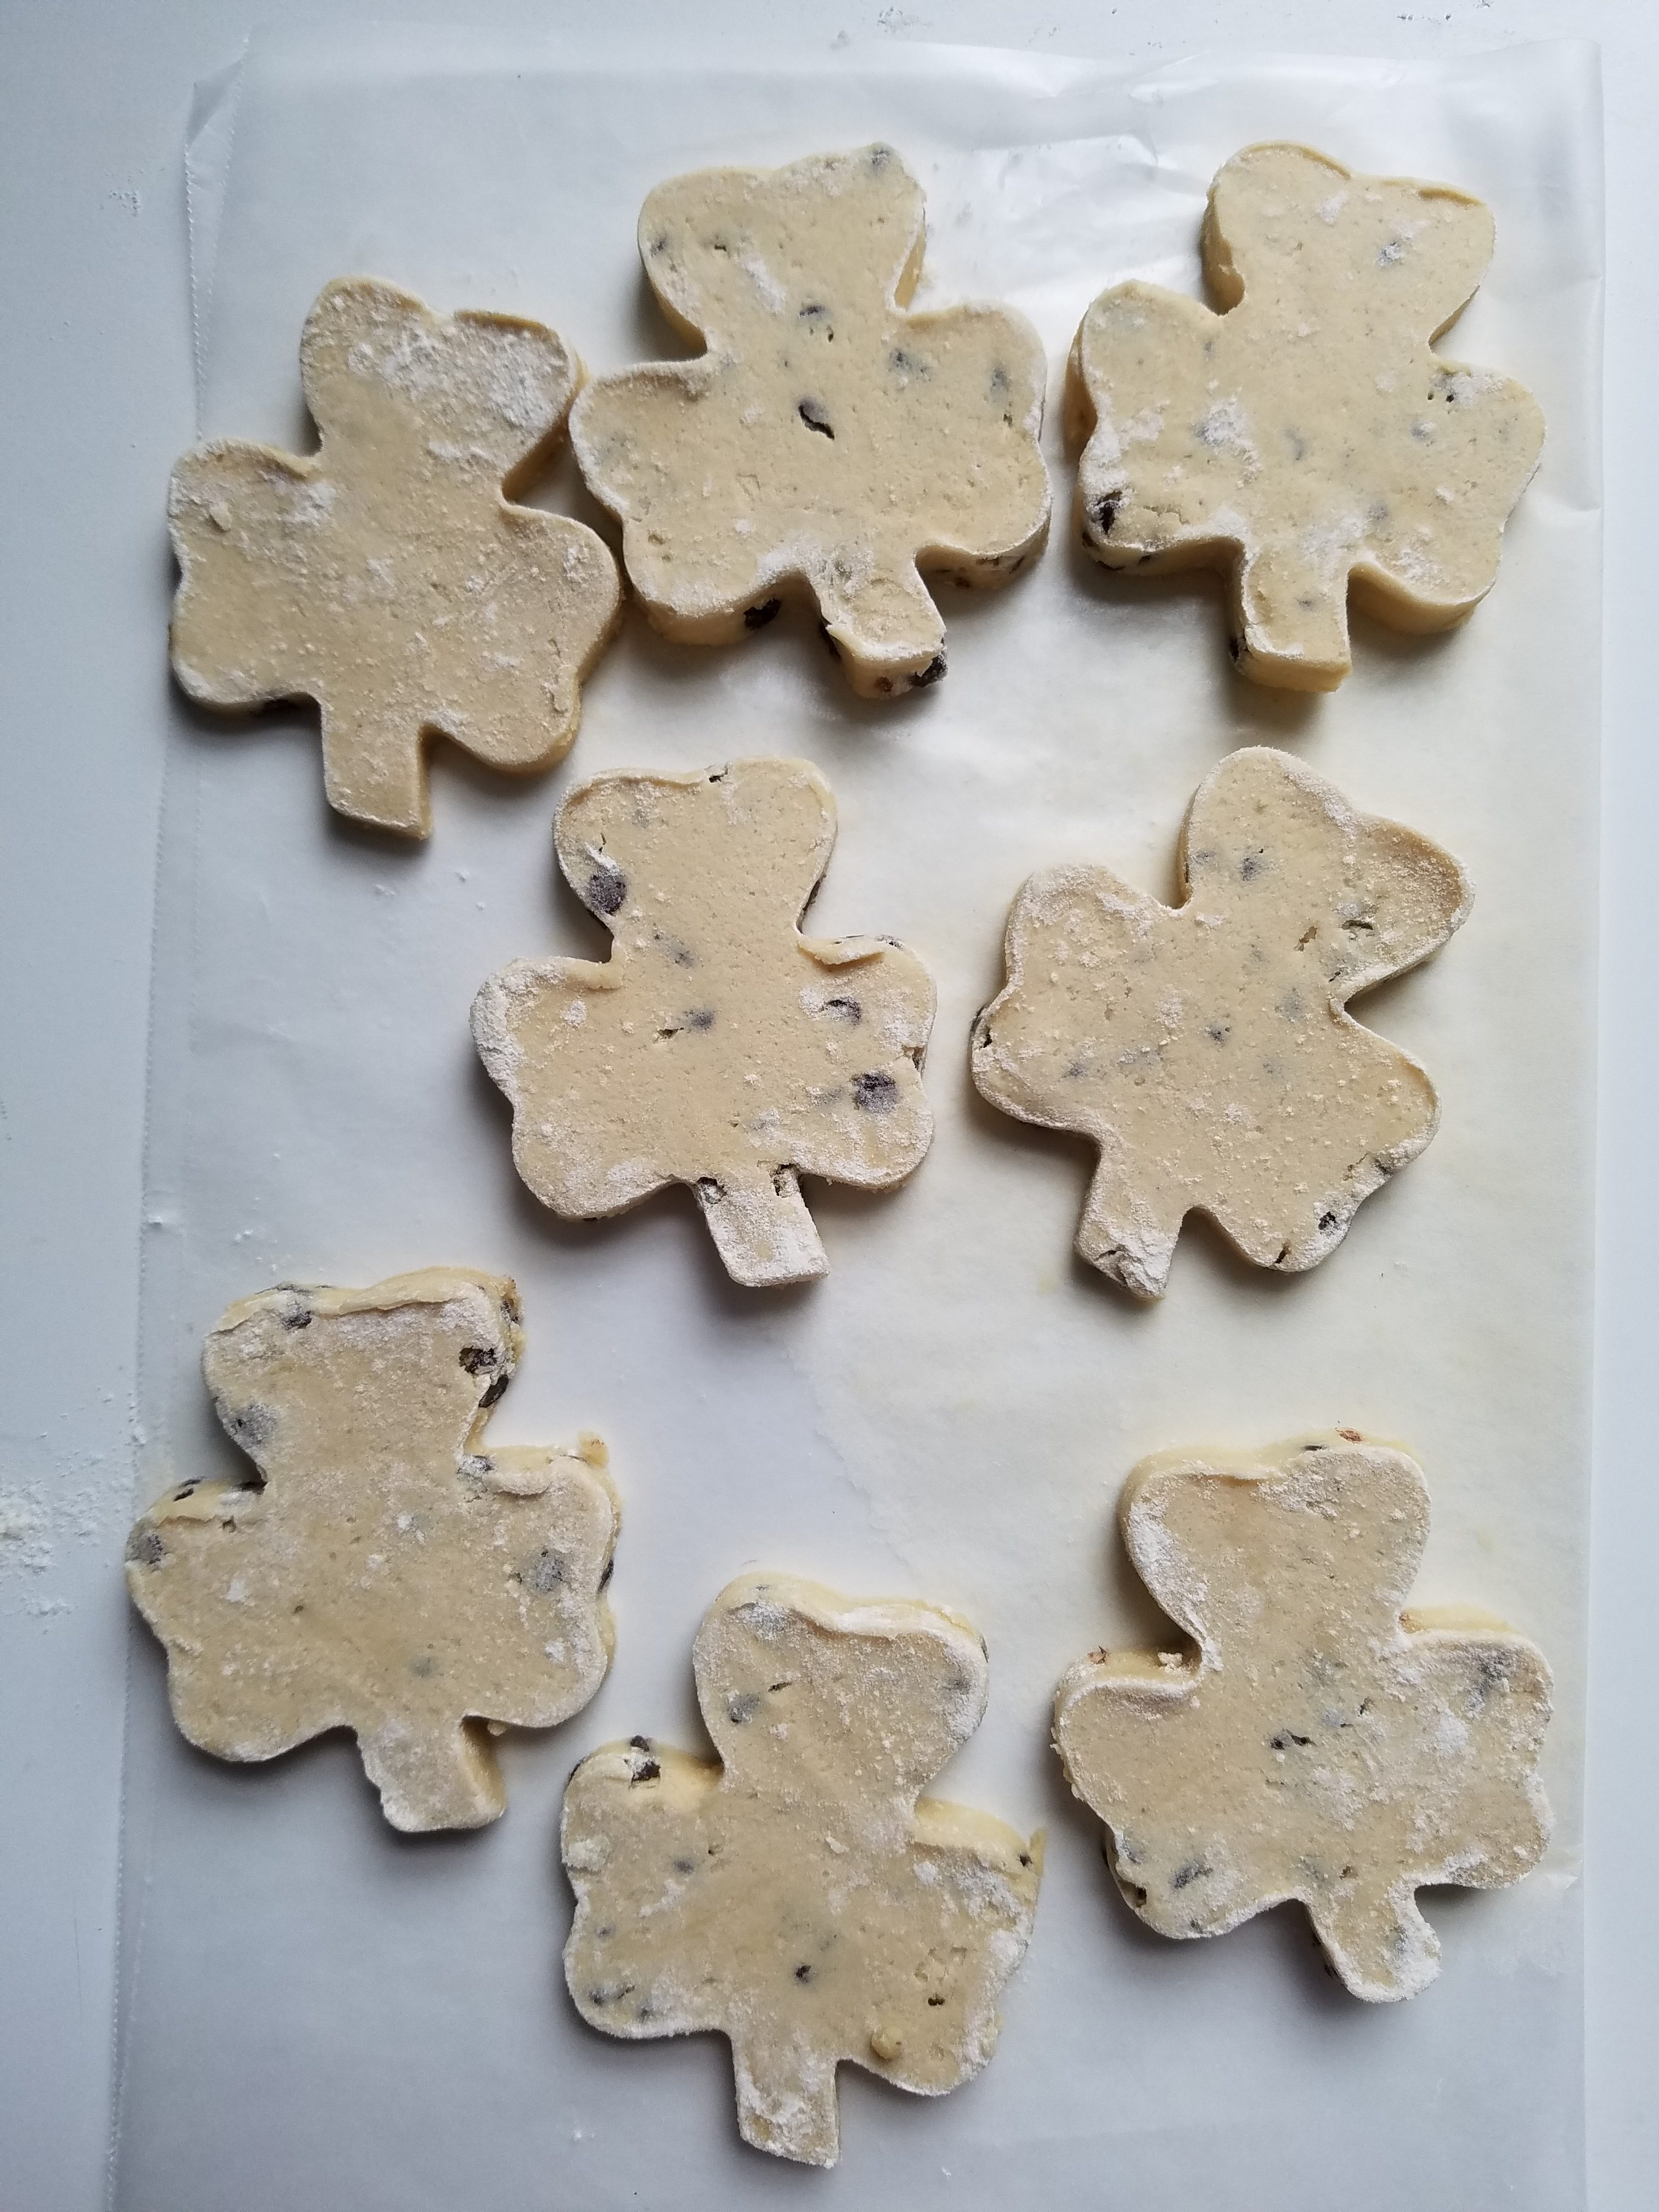
- You can either re-roll out the scrap dough to try and cut out a few more pieces, or just use that as snacking dough. 😉
- Place your cut out cookie dough on a clean sheet of wax paper and let it come to room temperature. If it is at all cold, the candy coating can harden while it is still clumpy. You want to give yourself as much time as possible.
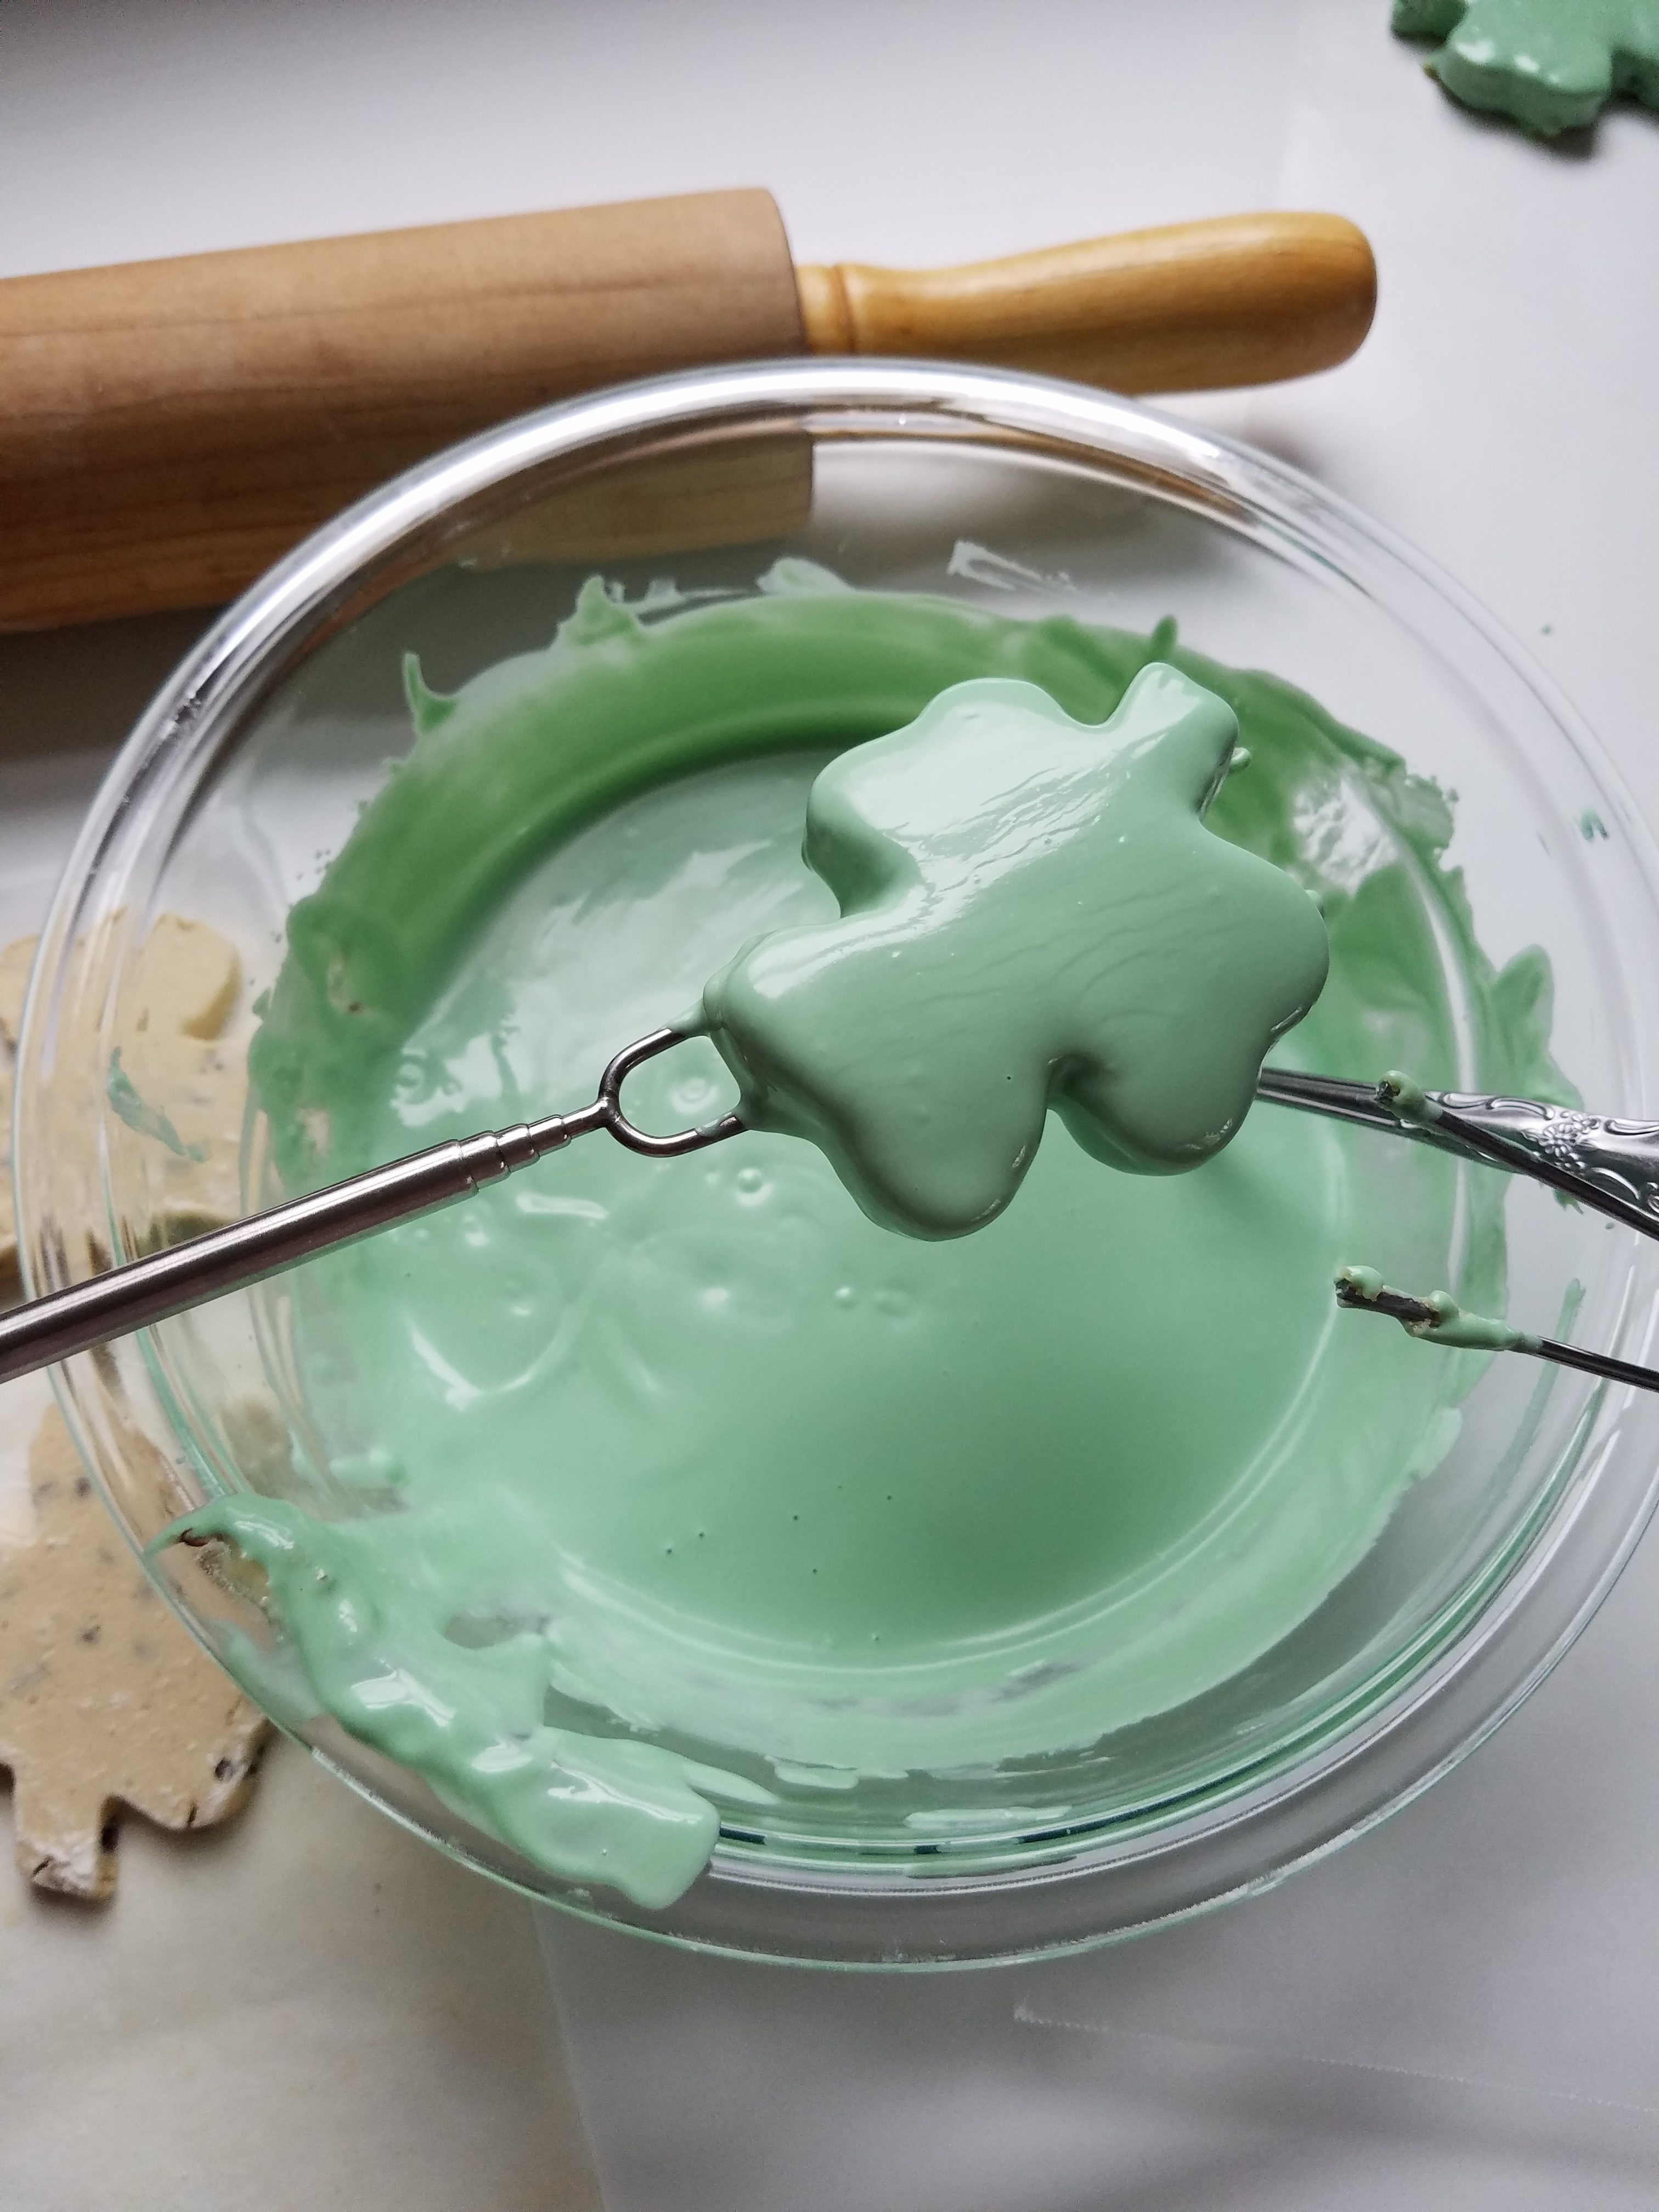
- Melt your candy coating according to the package instructions. At this point, the melted candy will still be too thick for you to work with it quickly enough. Add a few tablespoons of shortening at a time until you have a soupier consistency. It should be thick enough to coat the spoon but thin enough that it quickly runs off the spoon when pouring out a spoonful of it.
- Select two forks. Forks with more tines will offer more support for the shape of the dough, but the melted candy coating can pool more on the extra tines which makes it harder to let as much coating drip off as possible. Then you end up with more candy pooling around the dough on the wax paper. You'll have a little bit anyway that you'll have to cut away, but this created more. On the other hand, if you use a fork with only a few tines, like the hot dog fork l used, it's easier to let the candy coating drip off but it doesn't offer as much support for the dough. The hot coating melts the dough so you have to work VERY QUICKLY to get both sides coated and get it on the wax paper before the dough turns to mush.
- The moment of truth! Select one of your cookies and quickly drop it in the melted candy coating, flip it once, lift it out with your fork, let it drip for a second, run the bottom of the fork along the edge of the bowl to get a much excess candy off as possible, then slide it off the fork and onto the clean wax paper, trying not to distort the shape of the cookie. I used the second fork to sort of help slide the dough off of the first fork. You'll find the faster you can get all of these steps done, the cleaner your shamrock comes out. Keep in mind you're still going to fancy them up with chocolate striping/sprinkles/etc so that will help to hide some imperfections.
- Once all of your shamrocks are coated, let them harden completely. I let mine harden at room temperature but they would probably be fine if you popped them in the fridge for a few minutes too.
- Melt your chocolate and add stripes, swirls, dots, whatever you like to your shamrocks. If using chocolate flavored candy coating, you'll melt it according to the package instructions. No need to thin it out this time. If you're using actual bars of chocolate, you'll want to heat 2/3 of the chocolate very slowly in a double boiler or in the microwave. Candy coating can be saved if you over heat it and it gets chunky. Real chocolate can't. If it gets lumpy, it's ruined. Heat it slowly and stir it frequently. Once it's melted, add the remaining chocolate and stir constantly until it is all completely melted and has come down in temp a bit. Then pour it into a piping bag or ziplock sandwich bag, snip a teenie tiny corner off, and use that to pipe your stripes/zig zags/what have you.
- Let the chocolate harden completely before serving. You can use the flat side of a butter knife to cut away any edges that have formed around the base. It's easiest to do this when the coating has cooled slightly but is not completely hard. When it's liquid it just smears but when it's solid you may crack the rest of the candy shell trying to break away the edges. Letting it sit about 5 minutes or so at room temperature before cleaning up the edges works well.
*Easy Edible Cookie Dough Recipe
Recipe inspired by The SemiSweet Sisters
A few things I found helpful for this recipe:

I think these would also be amazing with a dark chocolate coating and green stripe drizzle. Do you celebrate St. Patrick’s Day? Do you have any fun St. Patrick’s Day traditions you look forward to every year? Do you have any favorite Irish recipes? I’ve made this Irish Apple Cake from The Kitchen Mccabe twice, and it is a keeper. Comment below!