
 The Story
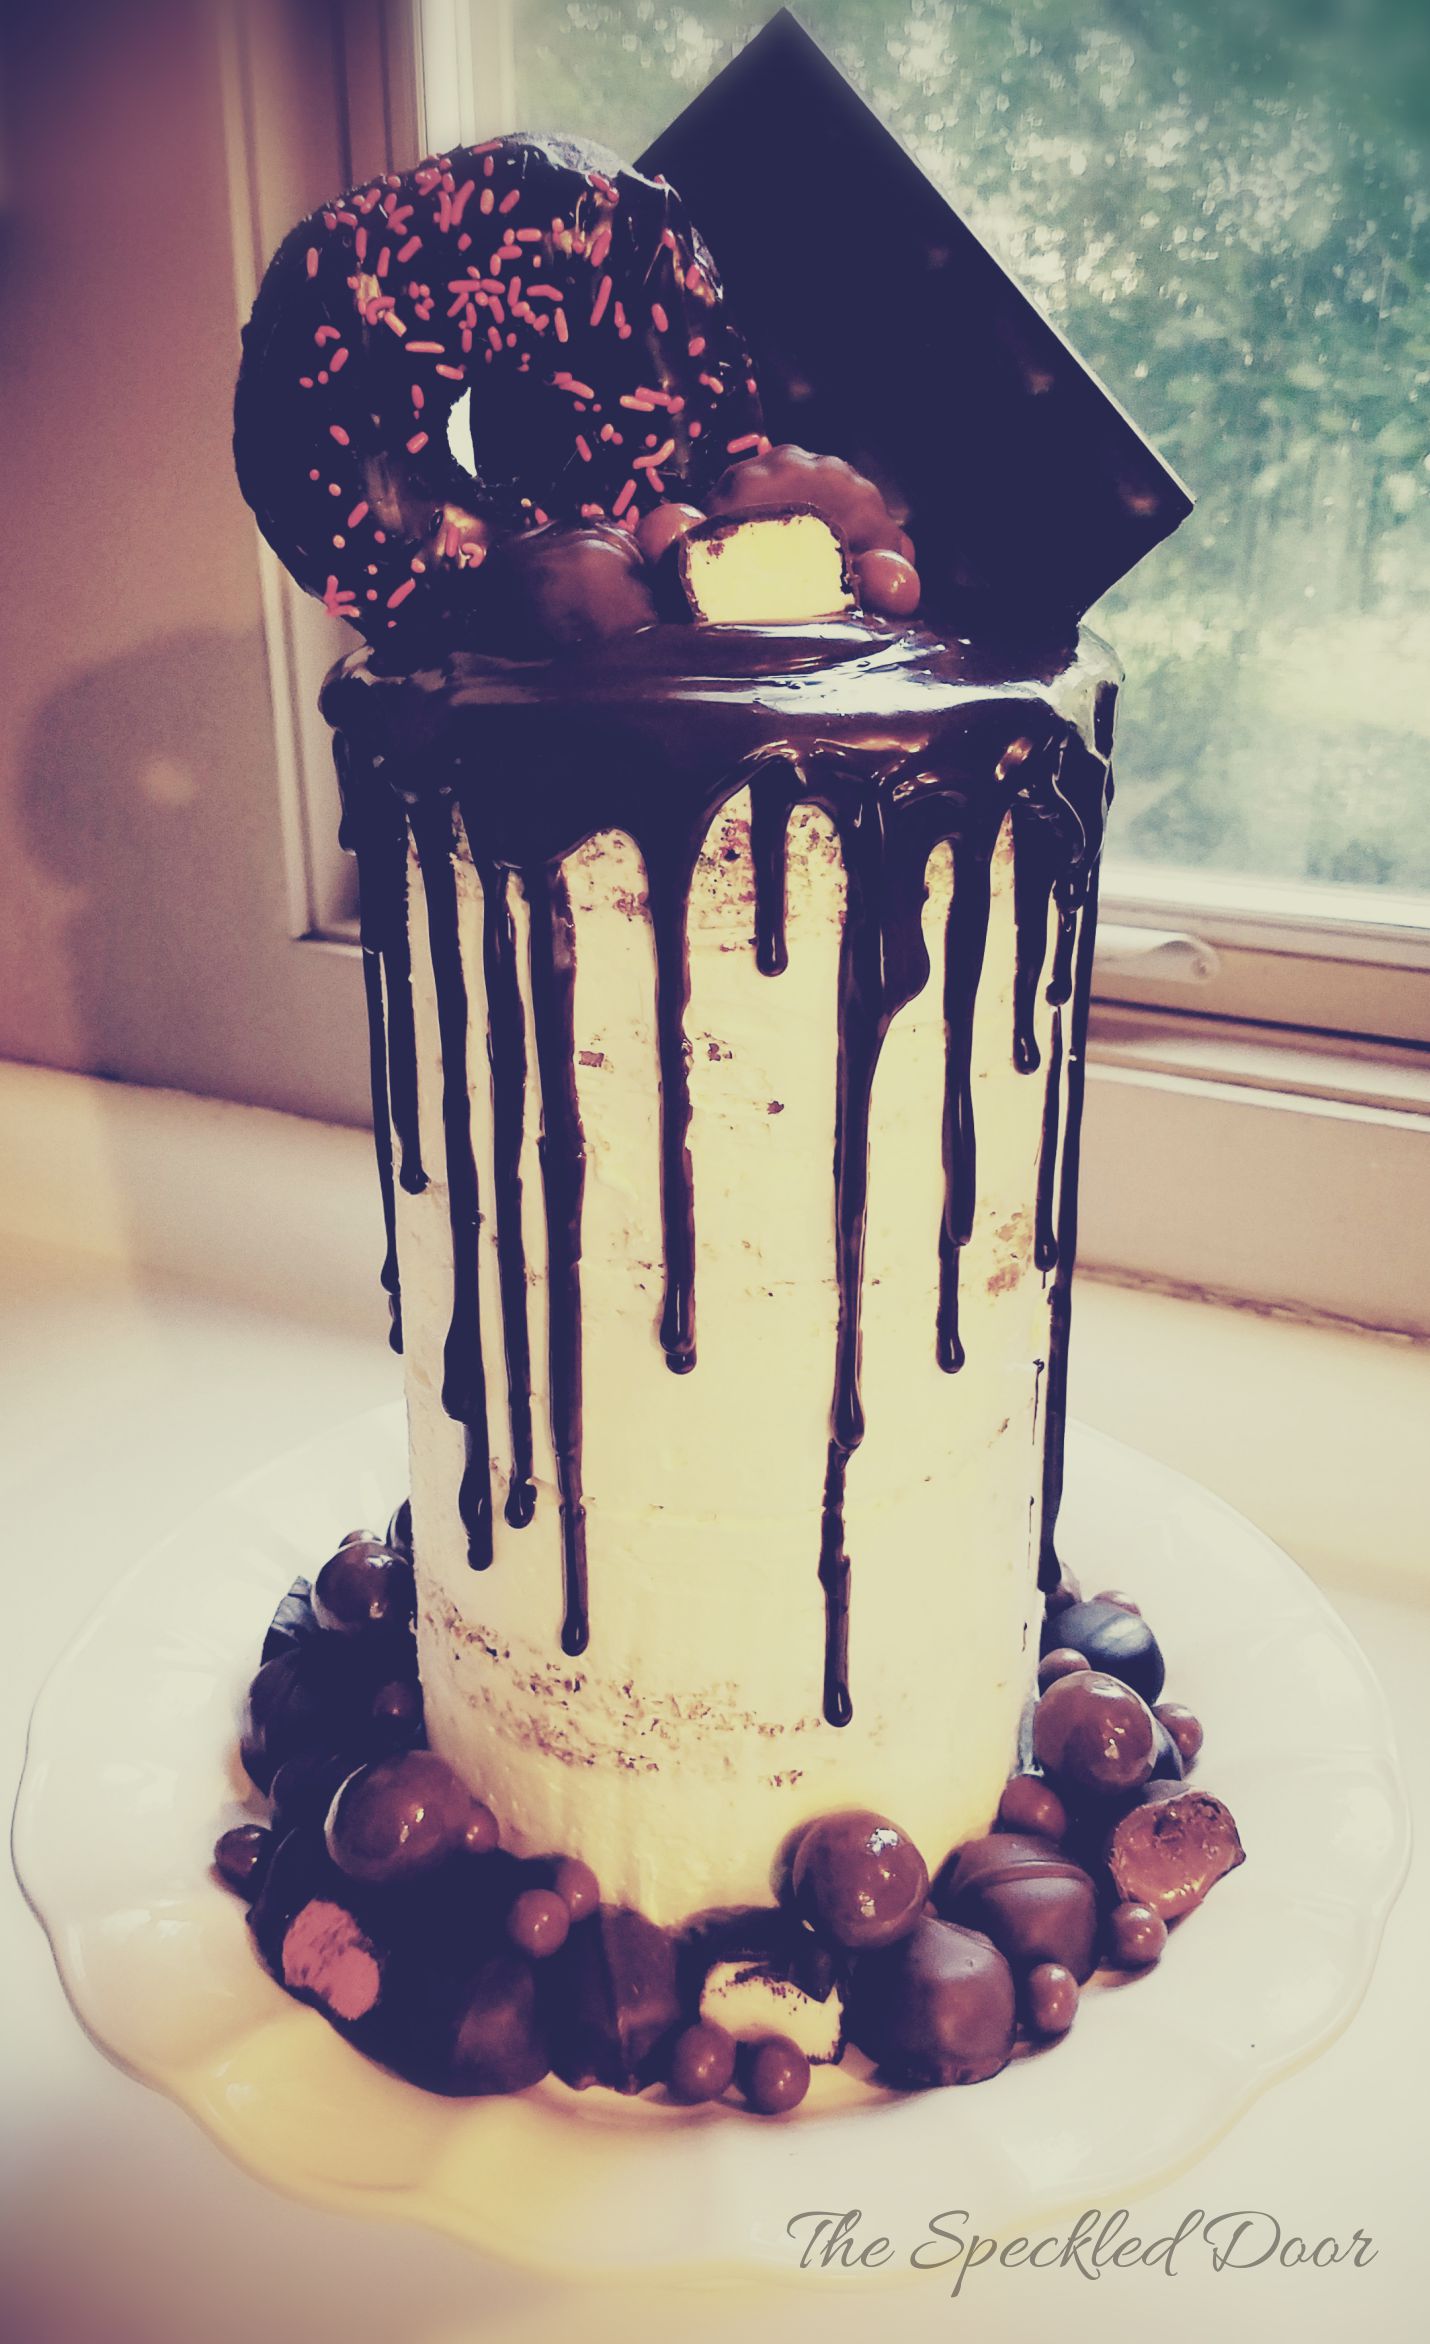
Every year for the last five or six years I’ve made a birthday cake for my husband. And every year for the last four or five years I’ve felt the need to one up the cake I made the previous year. If this continues, I can’t wait to see what his cakes look like in another five or six years.
I found the original design on Pinterest here but it didn’t include a recipe, only the picture. Fortunately, it is fairly simple construction. I love that it looks impressive and while there is a ton of chocolate on the outside, you could really use any kind of cake you’d like on the inside. I used funfetti cake here because that’s what my husband requested. Birthday cake flavored birthday cake is his favorite. 🙂
This is the tallest cake I’ve attempted to date. I usually prefer the look of 4 layer or 2 tier cakes but an unexpected perk to this 6 layer cake was that it ended up being much easier to serve than a 4 layer or 2 tier. Because of the cardboard cake round in the middle, I was able to just pop the top three layers off and onto a second plate and had two separate 3 layer cakes to slice. 4+ layer cakes can be difficult to serve because your slices tend to be really really skinny to avoid putting the amateurs into a sugar coma. 😉 Shorter cake means thicker slices which makes for easier slicing. PLUS we didn’t even end up needing to slice into the bottom 3 layers so we threw it in some Tupperware and tossed it in the freezer to be revisited in a month or so. I’ll be sure to post on update on how well this recipe keeps in the freezer once we’ve tried it.
Really the only down side to this cake I can think of is the chocolate accoutrements. I didn’t plan out the amount I’d need very well and ended up with a MASSIVE amount of excess after using what I needed on the cake. We had birthday cake, plus leftover birthday cake, plus frozen birthday cake, plus obscene amounts of chocolate this that and the other. I’m all for having a never ending supply of sugar in the house but we’ve been chipping away at the leftover parts for over a week now and the end appears to still be several weeks down the road. Good thing chocolate has such a long shelf life.
The Equipment
As with most projects, having the right tools for the job makes all the difference. Here’s a list of what I used:
- 6″ cardboard cake rounds ( I used 2)
- 6″ round metal cake pans
- parchment paper
- bamboo skewers (alternative to cake dowels. it’s what I had lying around)
- Something to cut the bamboo skewers (you’ll probably need something more heavy duty than a standard pair or scissors).
- revolving cake stand
- icing spatula
- icing smoother (or any rigid straight edge. The closer to the height of the finished cake the better)
- stainless steel scraper or cake lifter
- 6-6″ layers of cake (recipe link below)
- a double batch of icing (recipe link below)
- Whatever chocolate donuts, candies, cookies, bars, etc. you’d like to finish off your cake.
You could probably pull it off with only some of the items above or with makeshift substitutions but the time and effort having the right tools saves is well worth the investment, in my opinion. If this were the only cake I planned to make all year I’d probably feel differently but I get plenty of use out of all of my cake tools.
The Recipe
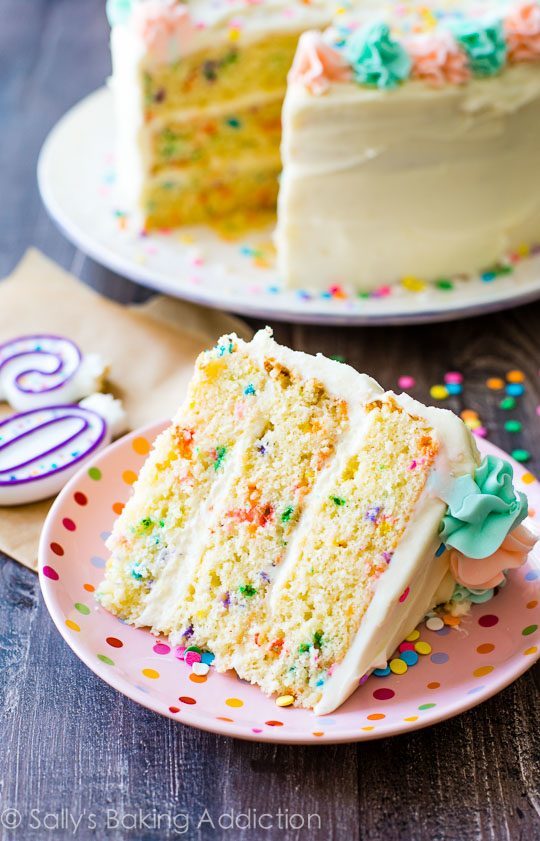 The core recipe for the cake and icing I used is here. Ganache recipe from Martha Stewart is here. I get almost all of my recipes from Pinterest. If you’ve spent any amount of time searching there for baked goods recipes, you’ve probably come across Sally’s Baking Addiction. I can’t say enough good things about this blog. I’ve never tried one of her recipes I didn’t like so I highly recommend searching there if you’re looking for a new one. I made a few adjustments to make it work in this instance:
- I used 6″ instead of 9″ round cake pans.
- I made two batches of cake batter but I really only needed 1.5 batches. Unless you have an unusually giant mixer, do not attempt to make both batches in one bowl. One batch pretty much maxed out my Kitchen Aid’s bowl capacity. 2 batches actually gave me 10 cake layers so 1.5 batches would have been just about perfect to make 6 slightly thicker cake layers.
- I have yet to find the right brand of confetti sprinkles that don’t bleed and create a tie die look on the inside but I can say with certainty that Betty Crocker’s Parlor Perfect Confetti Sprinkles are NOT what you should use if you want non-bleeding sprinkles.
- I added 1 tsp of almond extract per batch of cake batter. The combination of almond extract and buttermilk flavors are what really makes the “birthday cake” flavor work. I actually used imitation almond extract because we have a friend who is allergic to nuts who was going to be eating some and the flavor still came out great.
- I didn’t sift anything. Maybe it would have come out better if I had, but I didn’t. And it was delicious. So there.
- I made a double batch of icing. Again, I did two separate batches. Two wouldn’t have fit in one Kitchen Aid bowl. I don’t think 1.5 batches would have worked in this case. I used quite a bit between each layer and I still had a bit left over but not enough to have reduced it by half a batch.
- I used salted butter for both the cake batter and the icing. I pretty much always do.
- I didn’t grease the pans. Instead of greasing them, I traced and cut out parchment paper circles for the bottom of each pan and then DID NOT grease the sides of the pan. I’ll write more about this another time but for now, just trust me and try it.
- I baked the cake layers the night before, wrapped each cooled layer in saran wrap and refrigerated them until I was ready to put the cake together. Again, I’ll write more about this another time but I do this with pretty much every cake I make and it’s amazing for so many reasons.
As I said before, you could really use any cake recipe, including a boxed mix, and the finished product will look the same so choose your favorite and give it a whirl!
The Construction
- Trim your cake boards. Especially for a skim coated cake like this one, you’ll need to trim the cardboard rounds slightly to be sure they won’t show at all. I really don’t understand why a 6″ cake pan creates a cake that is slightly too small for a 6″ round cake board. Probably for the same reason a package of hot dogs never comes with the same quantity as a package of hot dog buns. Regardless, it doesn’t need to be pretty but I cut off about a quarter inch all the way around the edge of each board. Hold it over a finished layer to be sure it will sit just inside the edge of the cake. You’ll need 2 of them.
- Put a dollop of icing in the center of one cake board. This will make your first layer stick to the cake board base. Building the cake on a cake board base makes it possible and somewhat easy to move the cake from place to place. If you plan to ice the cake on the same cake stand or plate you’ll serve it on then this won’t be a concern for you. I always ice the cake on my revolving cake stand and then when I’m done I transfer it to whichever pretty stand or plate I plan to serve it on. You can also put a dollop of icing under the cake board to stick it to the cake stand your working on if you know it will slide around too much. You’ll still easily be able to run a spatula under the cake board to separate it from the stand when you need to move it later.
- Ice and stack your first 3 layers of cake. Cake, icing, cake, icing, cake, icing. I used a fairly thick layer, probably 1/4″-1/2″, so I’d have plenty of wiggle room to level out the layers as I stacked. This is one reason the rotating cake stand comes in handy. I just keep rotating and checking the eyeballing the top for level, pressing down and making adjustments where necessary. I always stack the cake layers upside down from how they bake in the pan. The “bottom” of each cake layer usually has a nicer, sharp edge and a super flat surface so any small rise or unevenness in the “top” will be compensated for by the thick layer of icing underneath it. As you press the layer down, the icing fills in the gaps around any lump and you’re left with a nice level top.
- Cut 3 bamboo skewers to length. It’s really not possible to do this ahead of time. They need to be exactly the right length. Once your first three layers are stacked with icing between each layer and on top, stick one skewer into the cake. Mark with a pencil or put your finger just barely below where the top of the icing level hits. Pull out the skewer, cut it to this length and cut two more skewers to the exact same length. Press all three into the cake vertically in a triangle formation about an inch in from the edge of the cake.
- Add your second cake board on top. If you cut your skewers to just below the icing line, the cake board should be supported by the skewers, but still touch and stick to the icing.
- Ice and stack your top 3 layers of cake. Put at least a dollop of icing on top of the cake board to ensure the 4th cake layer sticks to it. Cake, icing, cake, icing, cake, icing. Rotate and check that the top is level and sides are straight after each addition.
 Ice the sides and top. To get the rustic, skim coated look, you’re pretty much just doing a crumb coat on the sides. Maybe slightly thicker than a crumb coat but that’s up to your preferences. For the quick and dirty method, this is a great tutorial on getting the top flat with pretty sharp edges. If you have more time you can let the crumb coat sit for about 30 minutes until the icing forms a sort of crust. (You should be able to touch it with your finger gently without getting any icing on your finger). You can also put it in your fridge to speed up the process or if it’s too hot in your kitchen.
- Make and use the ganache let it cool for a bit before using it so it’s not too runny. If you let it cool for too long though, it won’t be runny enough and it gets a little clumpy as you try to make your drips longer. This is the problem I ran into. I really should have warmed it up a bit again before using it. It didn’t turn out too badly though and lesson learned for next time. This is a great tutorial on getting a drippy look with ganache.
- Place all of your chocolate decorations. I followed suit as closely as I could to the original picture but there are so many other chocolate goodies I’m sure would look amazing if you’ve got the right creative eye.
That’s it! It may seem like a lot but really none of it is that difficult. Straightening out the sides and making sure they are parallel is probably the most crucial part. Take your time and get that right and everything else comes together nicely. Have you ever tried a similar tall and narrow cake? Were there any additional tools you found helpful? Anything you did differently? Comment below!