
If you’re the type of person that is a hard core boxed mix fan and you have no desire to ever bake anything from scratch, this post is not for you. On the other hand, if you plan to bake a recipe from this blog (or any other blog), or if you bake more temperamental recipes like macarons or pavlovas, read on!
The Dry Cake Problem
I’ve been reading other blogs more regularly lately, and I inevitably skim through the comments section if a recipe looks particularly good, to see how the recipe worked out for others. One thing comes up repeatedly. A lot of the time, even the bloggers themselves don’t seem to know what to tell their readers about how to fix it. The problem is dry cakes.
So many times, a blogger will swear in their post that their cake is moist and fluffy and say it’s the perfect recipe. Then in the comments section, half of the people who made the cake agree, while the other half complain their cake came out dry and want to know what they could have done wrong. When it comes to baking, there are about a million things that could have gone wrong. Especially when you weren’t there to see how the cake was made, it’s very difficult to try to help troubleshoot.
Potential Reasons Your Cake May Be Dry
Oven Temp. – Oven temperatures vary. Unless you have a reliable thermometer in your oven, you may have been cooking at a higher temperature than you thought, which would dry out your cake.
Baking Time – Baking a cake for too long can cause a cake to dry out. The cake continues to cook while cooling off in the pan. If you wait to remove the cake from the oven until a skewer stuck into the center of the cake is completely dry, the cake will be overcooked by the time it’s finished cooling on the counter. You want to take it out just barely before it’s perfectly cooked. There should be a few moist (but solid) crumbs that cling to the skewer.
Over Mixing – Over mixing once the dry ingredients are added can cause a cake to become dense, chewy or dry.
Under Mixing – Not properly creaming the butter or beating the egg whites for recipes that call for either can cause a cake to turn out flat or dry.
Measuring Dry Ingredients Inaccurately
Depending on the ingredients and cooking method, there are a whole slew of other things that could go wrong, but one thing I don’t see brought up nearly enough is the measuring of dry ingredients. For recipes that are written using volume measurements (cups), you’re potentially adding significantly more flour/sugar/etc. than the recipe intends.
Volume vs. Weight
Volume measures how much space something takes up. For liquids, you’re never going to be able to fit more than one cup worth of water into a one cup measuring cup. It’s a bit trickier with dry ingredients though because many of them can be compressed and packed down. Kind of like when you’re coming home from a vacation and somehow you’re magically able to fit a weeks worth of souvenirs into a suitcase that was already full when you arrived. 😉
Especially with things like flour, powdered sugar and brown sugar, you can gently shake any of them into a cup until it’s full and then you have one full cup. You can then take that full cup though and press on the dry ingredient, compacting it down, and you’ll be left with space to add more of the dry ingredient. You can top it off and you now again have a full cup of the ingredient, yet it’s a different amount than the first “cup” of the ingredient you had. How do you know which version, or any variation in between, you are supposed to be using for the recipe? There is no real way to know. Brown sugar is well known for this as recipes will often say “lightly packed” or “firmly packed” but who’s to really say your version of “lightly” is the same as the person who wrote the recipe? Again, there’s no real way to know.
Measuring things by weight fixes this. No matter how you choose to compact an ingredient or not, 120 grams of an ingredient is always going to weigh 120 grams. There is no doubt that you’re using the exact same amount the recipe intends you to use.
I’ll probably create video on this at some point to show my point more thoroughly, but let’s just use flour as an example since it’s used in most baking. Here are a few common scenarios of measuring flour…
Flour Measuring Scenarios
- You keep your flour in the bag it came from the store in. When making a recipe, you simply stick your measuring cup in the bag and scoop out the desired amount.
- When you bring your flour home from the store, you empty it into a storage container in your pantry/cabinet/on your counter. When making a recipe, you use a spoon/scoop to shake the flour into your measuring cup. You then level off the measuring cup with the back of a knife/spatula/etc.
- When a recipe calls for a cup of flour, you look up the weight equivalent, place your bowl on a kitchen scale and add flour until you reach the exact desired weight.
There’s no way to know for sure without replying to every comment on every blog post that’s ever had problems with a dry cake, but I’d be willing to bet that a lot of the people with dry cake problems were using scenario #1, or something similar, to measure their dry ingredients. To show how this could be the problem, I measured flour using each method above and compared the results. As my “control” number, I used the King Aruthur Flour Ingredient Weight Chart. It shows you that a properly measured cup of all purpose flour should weigh 120 grams.
Comparing Flour Measuring Scenarios
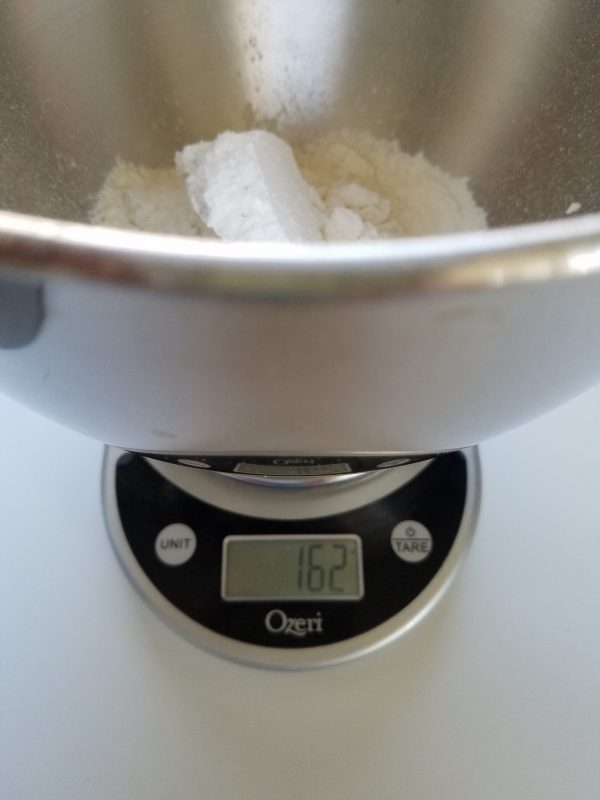
Scenario 1. The flour in the bags you get from the store is very compacted. When I stuck my 1 cup measuring cup in the bag, pulled it out and leveled off the excess with my finger, it weighed in at 162 grams. 42 grams over what King Arthur says it should weigh.
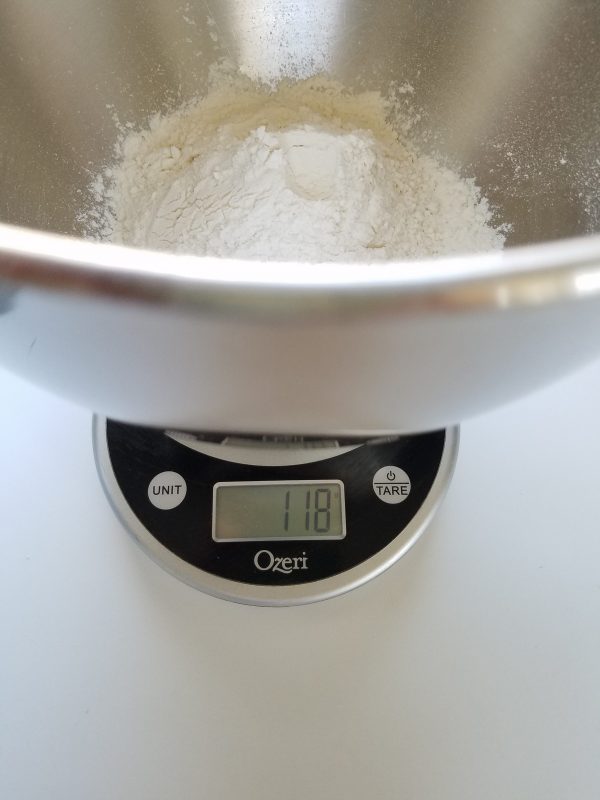
Scenario 2. When I scooped the flour out of the canister I keep on my counter, shook the flour into the 1 cup measuring cup, and leveled off the top with the back of a knife, it weighed in at 118 grams. 2 grams under what King Arthur says it should weigh.
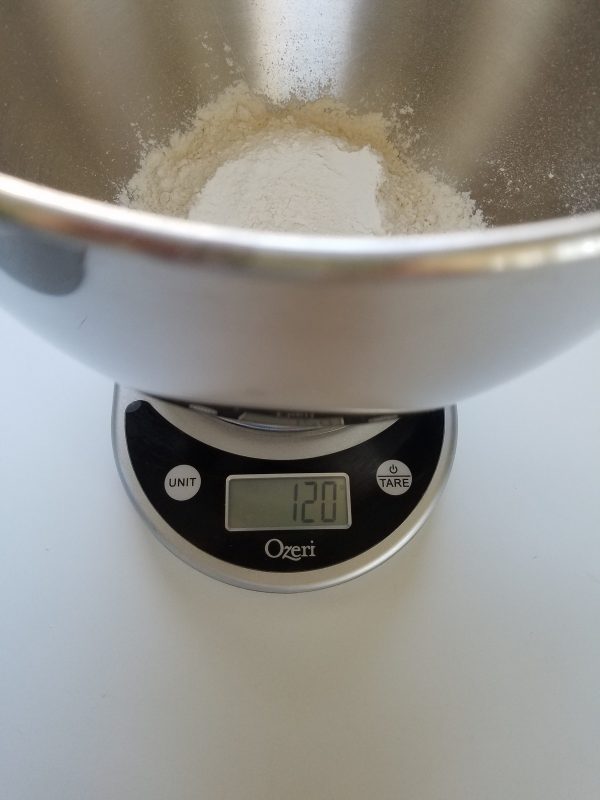
Scenario 3. Obviously, when I spoon flour directly into the bowl on the scale, I can easily make sure it gets to exactly 120 grams.
A Disaster Waiting to Happen
For most recipes, being off by 2 grams of flour is negligible and won’t make much of a difference to your recipe, if it makes any difference at all. Being off by 42 grams though, makes a huge difference and I suspect this is why many have dry cakes. If every time you measure a cup of flour, your over by 42 grams, that would mean if a recipe calls for 3 cups of flour, you’d be over by more than a full cup of flour!!! You better believe putting in 34% more flour than the recipe calls for is going to dry out the end result. And that’s just the flour. Imagine if you also did this with the brown sugar, powdered sugar and every other dry ingredient. You’re setting yourself up for disaster.
Using a Kitchen Scale is Easy
It may seem too confusing or like too much of a hassle, but it’s really just a matter of getting used to it. If you learned to bake using a scale and suddenly someone told you to switch to measuring cups, you’d think they were crazy and wonder why you’d want to dirty half a dozen little cups when you can just dirty one bowl by using a scale. I encourage you to try it out for a few recipes, maybe some particularly finicky ones, and see how it goes.
They’re inexpensive
If you don’t already have one, they are pretty inexpensive. You can get one for about $10 and they’re available at most grocery stores or you can get one shipped to your house for free using Amazon Prime. Try Amazon Prime 30-Day Free Trial. We have the model pictured below, also available on Amazon. I’ve had it for years and have never had a problem with it.

 How to use one

The steps are pretty simple. I usually have my mixing bowl and then one additional bowl out in case you need to measure out and add ingredients while the mixer is going.
- Set your empty bowl in the center of the scale, then press the power/tare button so the scale says “0”.
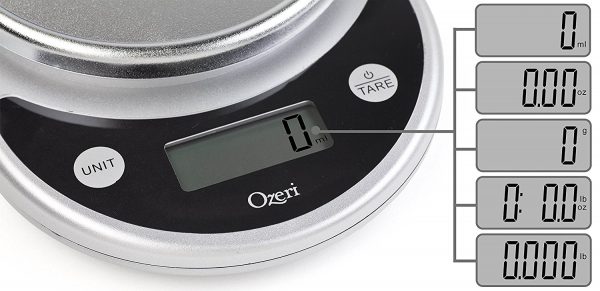
- Press the “unit” button until it shows the desired unit. ml = milliliters, oz = ounces, g = grams, lb = pounds.
- Then slowly add each of your ingredients until you’ve reached the desired weight. That’s it!
The Tare Button
Hitting the “tare” button zeros out the scale, so no matter how heavy the bowl is, you’re telling the scale to disregard that weight and start at zero. This makes measuring additional ingredients in the same bowl super easy. Weigh out your first ingredient, let’s say the flour. Once you have the correct weight, hit the “tare” button and the scale zeros out again. Then just add your next ingredient, let’s say the water or sugar, right on top. The only reason you’d need additional bowls is if the recipe says to mix things separately first, then add them together. You can also change the unit of measurement while you’re in the middle of measuring so you can switch from grams for flour to ml for water, etc.
So Gratifying for the OCD/Nerd in You
I cannot even begin to describe how gratifying it is to see those numbers hit dead-on for each ingredient. If something goes wrong with the recipe, I KNOW it wasn’t because I measured incorrectly. Do I have a touch of OCD or am I just a nerd? Maybe a little of both. ;P
Just think of all of the additional recipes you’ll be able to try!
I come across recipes quite a bit that are only written in grams/ml/oz because they’re from Europe/outside the US. If I didn’t have a kitchen scale, I either wouldn’t be able to make those recipes at all, or I’d have to try to convert the measurements in each recipe to volume units which be difficult because the brand of ingredients they use would likely be different from what I was using. Having a kitchen scale and being willing to use it opens up so many other recipe opportunities.
But SO MANY Recipes Use Volume Measurements.
This is true. But just because a lot of things are done a certain way, doesn’t mean that’s the best way to do them. 😉 Plus, I’ve created a conversion chart to solve that problem for you! Here is a free PDF version so you can print it out if you’d like. Kitchen Conversions. I’ve put things on here that I’ve had to reference a lot so I’ll likely update it as time goes on and I come across more things I’d like on my cheat sheet.
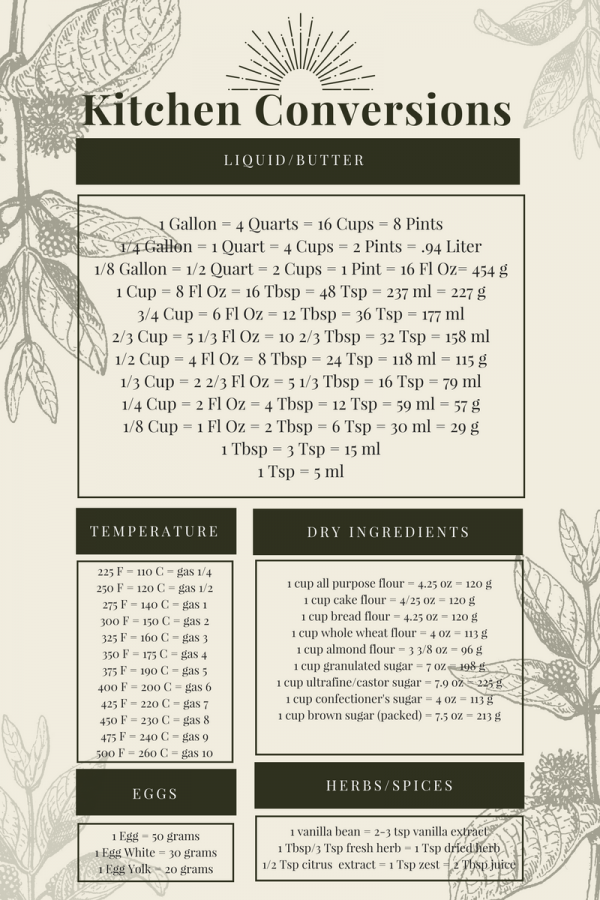
A few things to note about this chart…
These conversions are specific to the ingredients I use.
I always use King Arthur Flour so the weight conversions for the dry ingredients are the weights for their ingredients. It should be fairly close or potentially exactly the same for other brands, but it is possible for weights to slightly vary from brand to brand. Same goes for the eggs and even herbs and spices. Eggs come in all different sizes and even if they look the same size, there may be more white in one and a bigger yolk in the other. Vanilla beans can come in different lengths and one basil plant may be much stronger tasting than another. I’ve listed the estimates I use for reference when trying to swap things out/translate recipes.
The Liquid/Butter section may not apply to thicker liquids.
When you start getting into the heavy whipping cream and buttermilk range, they’re heavier. A cup of one of those is going to weigh more than a cup of water, so the liquid conversion section isn’t going to work for thicker liquids like that. I haven’t had too much of a need to convert the measurements of liquids outside of water/whole milk/melted butter, but if it becomes a recurring thing, I’ll likely add a section for the ones I use a lot.
Give it a try!
I challenge you to watch one season of The Great British Baking Show, or even better, The Great British Bake Off if you can somehow get a hold of it in the States, and see if you don’t want to immediately run out and buy a kitchen scale. If after watching, you still don’t want one, your baking soul is surely dead. ;P
Do you use a kitchen scale? Does it sound like something you’d want to try out? Have you ever made a cake that came out too dry and you think it might be because of how you measured the dry ingredients? Comment below!